
Blog
How To Preflight G2 / G2 VR – Startup in DCS
- (Thanks to @Jazz for noting the need and starting the steps)
NOTE: This is the most verbose manner in which you can launch DCS World in VR. Use this when you are having an issue or are unsure of the process.
Much has changed with respect to DCS, WMR, and SteamVR since this was written. If you’re having issues getting your software aligned and functional, this can help determine where there is an issue. Otherwise, it’s a heavy process.
OPTIONAL:
- Launch WMR
- Perform any calibration requested in the WMR Portal
- (Skip the manual launch of WMR4SVR/SteamVR)
- Launch DCS World in VR Mode
- – PLAY-
There are additional steps that can be taken to ensure that a minimal amount of Steam Services are running in the background. But generally, this method is a thinner launch for your rig memory space than the Verbose method below.
VERBOSE METHOD of LAUNCH
If you’re switching from an external-tracking VR HMD to an internal-tracking WMR HMD, there are significant differences around the process of getting DCS World running.
Once you’re in VR, you don’t want to jump out to fix and issue or launch a utility you forgot. Doing so can often cause a waterfall effect of issues that are on-going or cause you to restart the process.
Some pilots are reporting issues with inconsistent launching into VR, loss of DOF when in the cockpit, tracking issues once in the cockpit, or similar issues. Some of these issues can be traced to the inconsistent startup of VR or a process that doesn’t give you the best shot at it all coming together.
This set of steps works for any WMR headset using SteamVR and DCS.
Not needed for Oculus HMD’s.
Typical Multiplayer Pilot Scenario
Being in Discord chatting with your fellow pilots prior to launching a flight.
Expecting to use SRS, VoiceAttack, Joy2Key, or other utilities while in flight.
Components of WMR/SteamVR
Oculus devices have the required VR components embedded in their drivers and do not use WMR or SteamVR for enabling the headset in DCS.
For WMR based headsets the following software is required
- Windows Mixed Reality Portal: (WMR)
– Part of Windows 10. - RECOMMENDED: At LEAST Windows 10 2004 Update. (<<<LINK)
- Windows Mixed Reality for SteamVR: (WMR for SteamVR)
– Found in the Steam Store (free)- Then Select WMR for SteamVR BETA
- SteamVR:
– Found in the Steam Store (free)
Pre Startup
- Discord is already running on your desktop.
- You’ve taken care of stopping other applications, managing processes, turning off power save settings.
- Your area is well lit, allowing for good contrast for the cameras to map the area for tracking. Poor lighting is often the cause of bad tracking.
- Be sure you set “Input Switching” in the WMR Portal settings to “MANUAL using Windows Key – Y”
- Be sure you enabled “Suppress VR Warnings” and enabled “Do Not fade to Grid when app hangs” in the SteamVR settings.
- Controls free and clear, ready to go!
Preflighting VR and DCS
Step 1: Launch the WMR Portal 
Put on the headset and perform any calibration requested
- See Step 4(c) before launching for an optional process…
- Skip this step at your peril.
Usually, you’re ok, but how frustrating is it if you’re not and you have to start this process all over again… - When panning your head around for calibration, look down about 30 degrees to map the lower half of your Rig. This ensures looking at side panels isn’t a tracking issue later on.
- Set your headset aside and continue on with launching the utilities.
Step 2: Launch SRS 
Be sure it appears on the desktop and is ready to connect to your chosen server.
- Check that the Microphone and Speakers fields are as you expect.
This is the MOST common issue for SRS failures and frustration.
(Should not read DEFAULT – they should NAME the devices you are using) - If you haven’t already enabled this feature, ensure “Auto Connect Prompt” and “Auto Connect Mismatch Prompt” are enabled in SRS for servers supporting these features. If you forget to connect manually this will save frustration later.
Step 3: Launch VoiceAttack 
Be sure it appears on the desktop and is ready to accept voice commands
- Ensure the proper recording device is selected and the Headset icon shows on/off as is your preference.
- If VA doesn’t see your microphone or it’s muted or disabled outside of the program, the Microphone icon will turn RED.
- The Profile should match your default or the aircraft you are going to fly, depending on how you chose to set up VA.
- The Target field should show “Active Window”.
(Other Utilities)
- This is a good time to launch any other utilities such as Joy2Key that you may need and check their status as well.
Step 4: Launching SteamVR
There are some options and variations here I’ll list a few. Option (a) or (b) or (c) or (d).
You’ll have to see which branch of the process works best for your Rig.
How quickly the Rig can load the programs may be a factor in your choice of next steps.
Step 4(a): Launch WMR for SteamVR 
- Put on the Headset and be sure you now have proper tracking in the Steam Grid with all of your proper DOF.
- If you are missing some DOF (the grid moves forward and back when you do rather than tracking over the grid), you have an issue.
- Move your head around and see if it’s just tracking and contrast causing it, if it doesn’t clear in a few seconds, you have an issue.
Step 4(b): Launch Steam 
- After Steam starts up on your desktop, find the VR icon on the top and CLICK it.
- Tends to be better for slower machines or those having issues with other methods.
- Wait for the icon to turn green and you see the SteamVR window appear on the desktop.
Step 4(c): Launch WMR for Steam BEFORE Launching WMR Portal
- Launch your utilities before proceeding with WMR for Steam launch.
- VoiceAttack
- SRS
- etc.
- Put on your headset as you launch WMR for SteamVR.
- Launches WMR Portal straight away.
- You may not get a chance to calibrate, so take the risk there.
- The remainder of the required SteamVR programs launch.
- Go to Step 5.
Step 4(d): Go to Step 5
- WMR for SteamVR and other required Steam processes start automatically.
- Problematic on slower machines, where DCS may launch and look for hooks prior to the Steam processes being ready. Could then result in no VR in DCS or loss of DOF.
- Only possible if you have set SteamVR to launch on detection of VR programs launching.
Step 5: Launch DCS: 
- Preferably from the Skate Zilla DCS Launcher or native.
- DCS Settings:
- I do NOT recommend using the FULL-SCREEN option in the DCS settings page. This prevents any ALT-TAB ability you may need to use to correct issues.
- I DO recommend settings LALT-ENTER as soon as you’re in the cockpit, which takes DCS to temporary FULL-SCREEN and stops you from losing your mouse from desktop wandering. Also allows you to ALT-TAB out if you need to.
*** Now I have an issue but restarting SteamVR didn’t fix it…
The following is faster than a complete PC restart unless you really need to walk away for a moment…
- Exit and stop DCS
- End SteamVR
- End Steam (if it’s running)
- End WMR Portal
- Check your running processes for any residual SteamVR elements.
Check for them and End them all in the CTRl-ALT-DELETE window.- Steam Server
- Steam Helpers
- Steam Web stuff
- Steam Compositor
Preflighting WMR/SteamVR for DCS
(Thanks to @Jazz for noting the need and starting the steps)
If you’re switching from an external-tracking VR HMD to an internal-tracking WMR HMD, there are significant differences around the process of getting DCS running.
Once you’re in VR, you don’t want to jump out to fix and issue or launch a utility you forgot. Doing so can often cause a waterfall effect of issues that are on-going or cause you to restart the process.
Some pilots are reporting issues with inconsistent launching into VR, loss of DOF when in the cockpit, tracking issues once in the cockpit, or similar issues. Some of these issues can be traced to the inconsistent startup of VR or a process that doesn’t give you the best shot at it all coming together.
This set of steps works for any WMR headset using SteamVR and DCS.
Not needed for Oculus HMD’s.
Typical Multiplayer Pilot Scenario
Being in Discord chatting with your fellow pilots prior to launching a flight.
Expecting to use SRS, VoiceAttack, Joy2Key, or other utilities while in flight.
Components of WMR/SteamVR
Oculus devices have the required VR components imbedded in their drivers and do not use WMR or SteamVR for enabling the headset in DCS.
For WMR based headsets the following software is required
- Windows Mixed Reality Portal: (WMR)
– Part of Windows 10. - Windows Mixed Reality for SteamVR: (WMR for SteamVR)
– Found in the Steam Store (free) - SteamVR:
– Found in the Steam Store (free)
Pre Startup
- Discord is already running on your desktop.
- You’ve taken care of stopping other applications, managing processes, turning off power save settings.
- Your area is well lit, allowing for good contrast for the cameras to map the area for tracking. Poor lighting is often the cause of bad tracking.
- Be sure you set “Input Switching” in the WMR Portal settings to “MANUAL using Windows Key – Y”
- Be sure you enabled “Suppress VR Warnings” and enabled “Do Not fade to Grid when app hangs” in the SteamVR settings.
- Controls free and clear, ready to go!
Preflighting VR and DCS
Step 1: Launch the WMR Portal
Put on the headset and perform any calibration requested
- See Step 4(c) before launching for an optional process…
- Skip this step at your peril.
Usually, you’re ok, but how frustrating is it if you’re not and you have to start this process all over again… - When panning your head around for calibration, look down about 30 degrees to map the lower half of your Rig. This ensures looking at side panels isn’t a tracking issue later on.
- Set your headset aside and continue on with launching the utilities.
Step 2: Launch SRS
Be sure it appears on the desktop and is ready to connect to your chosen server.
- Check that the Microphone and Speakers fields are as you expect.
This is the MOST common issue for SRS failures and frustration.
(Should not read DEFAULT – they should NAME the devices you are using) - If you haven’t already enabled this feature, ensure “Auto Connect Prompt” and “Auto Connect Mismatch Prompt” are enabled in SRS for servers supporting these features. If you forget to connect manually this will save frustration later.
Step 3: Launch VoiceAttack
Be sure it appears on the desktop and is ready to accept voice commands
- Ensure the proper recording device is selected and the Headset icon shows on/off as is your preference.
- If VA doesn’t see your microphone or it’s muted or disabled outside of the program, the Microphone icon will turn RED.
- The Profile should match your default or the aircraft you are going to fly, depending on how you chose to set up VA.
- The Target field should show “Active Window”.
(Other Utilities)
- This is a good time to launch any other utilities such as Joy2Key that you may need and check their status as well.
Step 4: Launching SteamVR
There are some options and variations here I’ll list a few. Option (a) or (b) or (c) or (d).
You’ll have to see which branch of the process works best for your Rig.
How quickly the Rig can load the programs may be a factor in your choice of next steps.
Step 4(a): Launch WMR for SteamVR
- Put on the Headset and be sure you now have proper tracking in the Steam Grid with all of your proper DOF.
- If you are missing some DOF (the grid moves forward and back when you do rather than tracking over the grid), you have an issue.
- Move your head around and see if it’s just tracking and contrast causing it, if it doesn’t clear in a few seconds, you have an issue.
Step 4(b): Launch Steam
- After Steam starts up on your desktop, find the VR icon on the top and CLICK it.
- Tends to be better for slower machines or those having issues with other methods.
- Wait for the icon to turn green and you see the SteamVR window appear on the desktop.
Step 4(c): Launch WMR for Steam BEFORE Launching WMR Portal
- Launch your utilities before proceeding with WMR for Steam launch.
- VoiceAttack
- SRS
- etc.
- Put on your headset as you launch WMR for SteamVR.
- Launches WMR Portal straight away.
- You may not get a chance to calibrate, so take the risk there.
- The remainder of the required SteamVR programs launch.
- Go to Step 5.
Step 4(d): Go to Step 5
- WMR for SteamVR and other required Steam processes start automatically.
- Problematic on slower machines, where DCS may launch and look for hooks prior to the Steam processes being ready. Could then result in no VR in DCS or loss of DOF.
- Only possible if you have set SteamVR to launch on detection of VR programs launching.
Step 5: Launch DCS:
- Preferably from the Skate Zilla DCS Launcher or native.
- DCS Settings:
- I do NOT recommend using the FULL-SCREEN option in the DCS settings page. This prevents any ALT-TAB ability you may need to use to correct issues.
- I DO recommend settings LALT-ENTER as soon as you’re in the cockpit, which takes DCS to temporary FULL-SCREEN and stops you from losing your mouse from desktop wandering. Also allows you to ALT-TAB out if you need to.
*** Now I have an issue but restarting SteamVR didn’t fix it…
The following is faster than a complete PC restart unless you really need to walk away for a moment…
- Exit and stop DCS
- End SteamVR
- End Steam (if it’s running)
- End WMR Portal
- Check your running processes for any residual SteamVR elements.
Check for them and End them all in the CTRl-ALT-DELETE window.- Steam Server
- Steam Helpers
- Steam Web stuff
- Steam Compositor
How To Surpass VR – Really Good Seat Shaker (DIY)
When I first joined the 231st Harrier Squadron as a part of JTF-1 (then CSG-1) – I was bombarded with – “If you’re VR, you have to get seat shakers! They are as immersive as VR, all over again.” 20 minutes of explanation later, links to the equipment on Amazon – I was on my way!
I hope you enjoy the added experience and immersion as much as I do!
- Everything you need to get started is here.
Take your time.
Be neat in your cabling.
Enjoy the results and immersion you add to your VR experience!
What is this?
Briefly, seat shakers are transducers added to your chair, desk, controls that along with a finely crafted piece of software, take the mechanical and aerodynamic movements of your jet in DCS and supply tuned frequency vibrations to your chair. This is NOT pumping the sound of your sim through your seat, that would not have the desired effect.
- When control surfaces move, you feel it.
- When gear moves and locks you feel it.
- When your speed-brake extends, you feel it.
- When you taxi over bumps and expansion joints, you feel them.
- When you land, eject, get hit by a missile, break your jet, fly too fast, too slow, launch weapons, yes – you feel it.
EXAMPLE Jet Events for the AV-8B-NA in DCS and Settings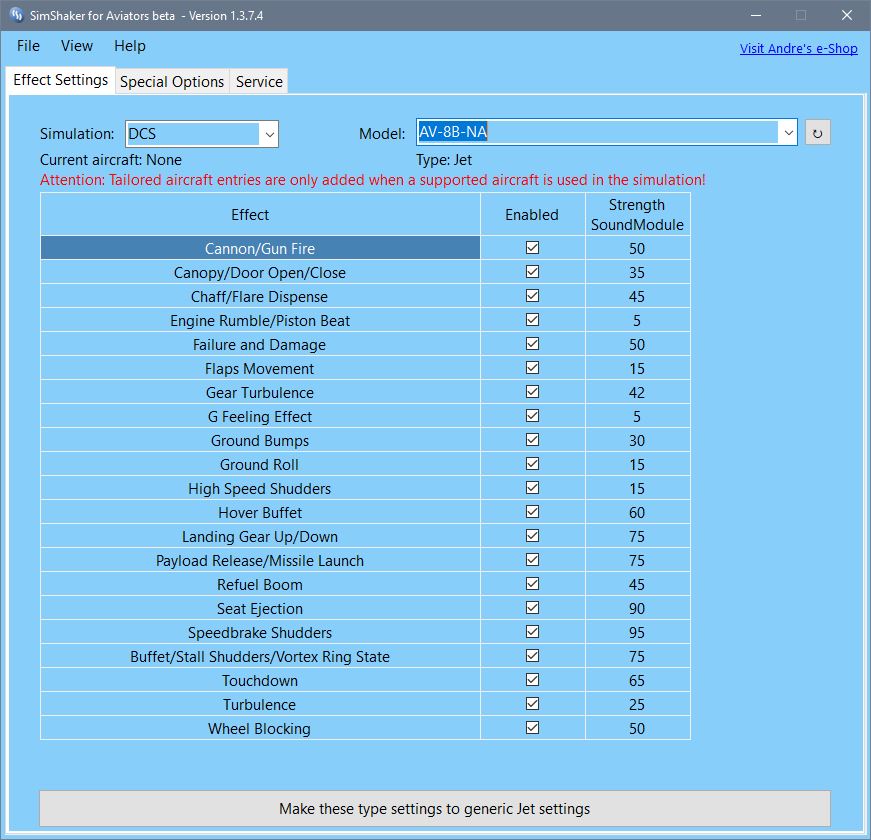
I sourced this material from various places on the ED Forums and from my fellow pilots in the 231st. This is a consolidation of what I have learned and am sharing for your benefit.
What do you need?
- Dedicated Sound Out
- Cannot be shared with your headset, desktop sound out to speakers, etc.
- Again, this is NOT taking game sound and vibrating your chair.
- You “could” use Voicemeeter Banana, but I don’t recommend that unless you already know how to use it and have experience.
- Preferably a Sub Out on a sound card or similar. Can be a USB sound device (EX: BlasterX G1), the Sound Device on your motherboard (provided you aren’t using it for anything else), a new simple sound card in an available slot.
- Cannot be shared with your headset, desktop sound out to speakers, etc.
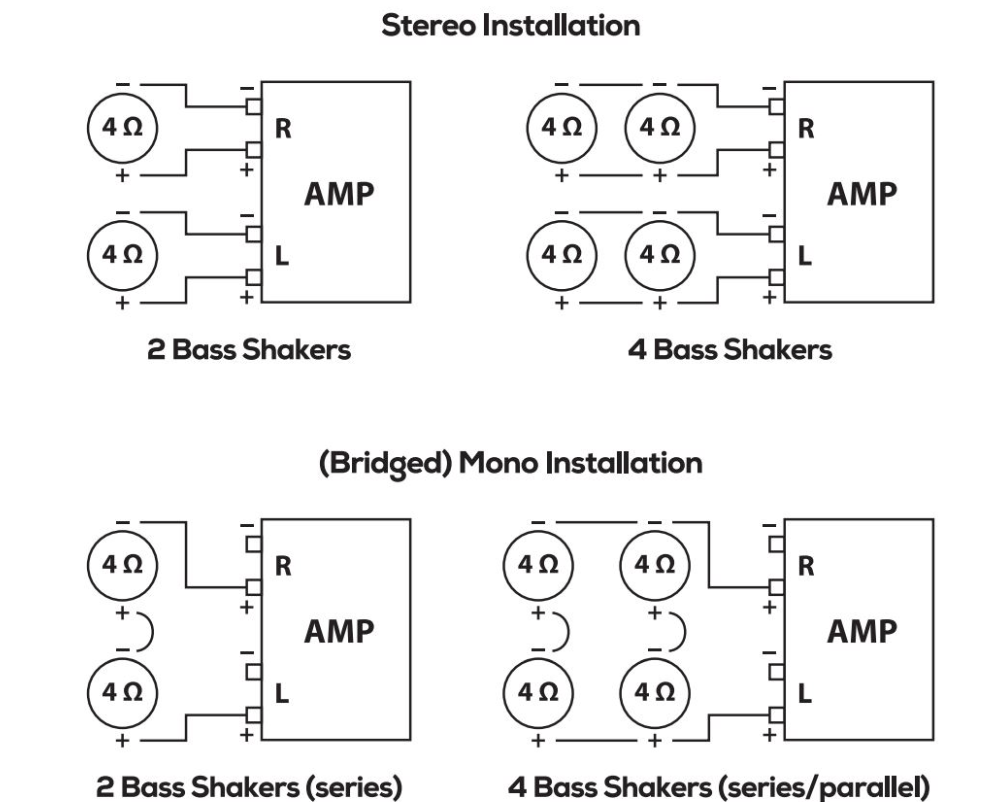
- Transducers (at least 2, maybe more)
- An Amp capable of driving the 2 or more transducers
- You may have an extra stereo amp hanging around, headphone amp, whatever the math works out to be on ohms and power required.
Your call. Recommendations listed below.
- You may have an extra stereo amp hanging around, headphone amp, whatever the math works out to be on ohms and power required.
- Various Cables to hook the PC sound out to the Amp and Transducers to the Amp.
- Screws to mount the transducers to your chair.
- A chair that is suitable for modifying.
- Accepting screws, allowing for cable management, etc.
- This is where your imagination and fabrication skills get to have some fun.
What are the parts?
I’m not going into all of the permutations or options you can have with this setup. This guide is just to get you going, and you can plan, tune, upgrade as you desire once it’s up and running.
Your implementation will be custom, as every Rig is different, you have varying degrees of available sound cards, etc. This is a LOT more simply done that you will think while looking at the list. Really is VERY simple.
Typical Hardware Listing
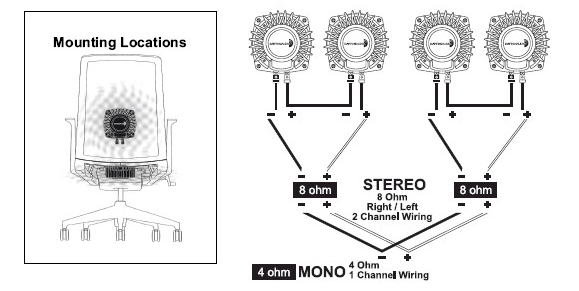
- At least (2) Transducers
- OPTIONAL: (2) Additional smaller Transducers if you want on-the-throttle and on-the-stick shakers.
- OPTIONAL: (2) Small Sub-Woofer External Amp(s) instead of one, depending on the number of transducers you are driving. (4+) Transducers, you may want one Amp per side or grouping.
- You can have as many as 6 channels (5.1) with the software. As many transducers as you want to power and wire. I would NOT start with this though.
- Cable: 3.5mm cable to 3.5mm, or 3.5mm to Stereo RCA, depending on your amp
- Various Cable Extensions depending on locations of devices
- Power Strip
- 5mm Audio Extension (if needed)
- RCA Extension (if needed)
- Speaker Wire
Lamp Cord will work just as well. Seriously. Physics works folks.
No Monster Cable required, save your pennies for more toys. - Zip Ties
- Screws
- Available nearby power for your Amp(s)
- OPTIONAL: Headphone 4-Channel Amp if you want to run multiple Amps and split and control the output for L/R and/or Seat/Stick shakers.
Software
Start with Andre’s Blog <<<LINK
(Both of the following applications are required for DCS and DIY SimShakers)
- DOWNLOAD LINK: SimShaker for Aviators (Freeware)
- DOWNLOAD LINK: SimShaker Sound Module (Payware)
Other Guides and Info
PGSS HARDWARE COMPONENTS
https://kit.co/Thud/diy-seat-shaker-gear
Example Setup
I sourced these from the Internet and from SNACKO on the ED Forums.
https://forums.eagle.ru/showpost.php?p=3080963&postcount=1


PGSS – Pretty Good Seat Shaker (DIY)
When I first joined the 231st Harrier Squadron as a part of JTF-1 (then CSG-1) – I was bombarded with – “If you’re VR, you have to get seat shakers! They are as immersive as VR, all over again.” 20 minutes of explanation later, links to the equipment on Amazon – I was on my way!
I hope you enjoy the added experience and immersion as much as I do!
- Everything you need to get started is here.
Take your time.
Be neat in your cabling.
Enjoy the results and immersion you add to your VR experience!
What is this?
Briefly, seat shakers are transducers added to your chair, desk, controls that along with a finely crafted piece of software, take the mechanical and aerodynamic movements of your jet in DCS and supply tuned frequency vibrations to your chair. This is NOT pumping the sound of your sim through your seat, that would not have the desired effect.
- When control surfaces move, you feel it.
- When gear moves and locks you feel it.
- When your speed-brake extends, you feel it.
- When you taxi over bumps and expansion joints, you feel them.
- When you land, eject, get hit by a missile, break your jet, fly too fast, too slow, launch weapons, yes – you feel it.
EXAMPLE Jet Events for the AV-8B-NA in DCS and Settings
I sourced this material from various places on the ED Forums and from my fellow pilots in the 231st. This is a consolidation of what I have learned and am sharing for your benefit.
What do you need?
- Dedicated Sound Out
- Cannot be shared with your headset, desktop sound out to speakers, etc.
- Again, this is NOT taking game sound and vibrating your chair.
- You “could” use Voicemeeter Banana, but I don’t recommend that unless you already know how to use it and have experience.
- Preferably a Sub Out on a sound card or similar. Can be a USB sound device (EX: BlasterX G1), the Sound Device on your motherboard (provided you aren’t using it for anything else), a new simple sound card in an available slot.
- Cannot be shared with your headset, desktop sound out to speakers, etc.
- Transducers (at least 2, maybe more)
- An Amp capable of driving the 2 or more transducers
- You may have an extra stereo amp hanging around, headphone amp, whatever the math works out to be on ohms and power required.
Your call. Recommendations listed below.
- You may have an extra stereo amp hanging around, headphone amp, whatever the math works out to be on ohms and power required.
- Various Cables to hook the PC sound out to the Amp and Transducers to the Amp.
- Screws to mount the transducers to your chair.
- A chair that is suitable for modifying.
- Accepting screws, allowing for cable management, etc.
- This is where your imagination and fabrication skills get to have some fun.
What are the parts?
I’m not going into all of the permutations or options you can have with this setup. This guide is just to get you going, and you can plan, tune, upgrade as you desire once it’s up and running.
Your implementation will be custom, as every Rig is different, you have varying degrees of available sound cards, etc. This is a LOT more simply done that you will think while looking at the list. Really is VERY simple.
Typical Hardware Listing
- At least (2) Transducers
- OPTIONAL: (2) Additional smaller Transducers if you want on-the-throttle and on-the-stick shakers.
- OPTIONAL: (2) Small Sub-Woofer External Amp(s) instead of one, depending on the number of transducers you are driving. (4+) Transducers, you may want one Amp per side or grouping.
- You can have as many as 6 channels (5.1) with the software. As many transducers as you want to power and wire. I would NOT start with this though.
- Cable: 3.5mm cable to 3.5mm, or 3.5mm to Stereo RCA, depending on your amp
- Various Cable Extensions depending on locations of devices
- Power Strip
- 5mm Audio Extension (if needed)
- RCA Extension (if needed)
- Speaker Wire
Lamp Cord will work just as well. Seriously. Physics works folks.
No Monster Cable required, save your pennies for more toys. - Zip Ties
- Screws
- Available nearby power for your Amp(s)
- OPTIONAL: Headphone 4-Channel Amp if you want to run multiple Amps and split and control the output for L/R and/or Seat/Stick shakers.
Software
Start with Andre’s Blog <<<LINK
(Both of the following applications are required for DCS and DIY SimShakers)
- DOWNLOAD LINK: SimShaker for Aviators (Freeware)
- DOWNLOAD LINK: SimShaker Sound Module (Payware)
Other Guides and Info
Hardware Example Amazon Links
Order from these links to help me pay for the Blog!
- Large Transducers Required [(1) For chair base (1) For chair back]
- ORDER FROM AMAZON <<<LINK
- Small Transducers Optional adds [Stick & Pedal shakers]
- ORDER FROM AMAZON <<<LINK
- Amp Example
- ORDER FROM AMAZON <<<LINK
- Headphone Amplifier Example
- Optional for more transducers and added level control
- ORDER FROM AMAZON <<<LINK
- Speaker Wire
- ORDER FROM AMAZON <<<LINK
Example Setup
I sourced these from the Internet and from SNACKO on the ED Forums.
https://forums.eagle.ru/showpost.php?p=3080963&postcount=1


How To: Process Lasso – Simple DCS World Tuning
This initial setup for Process Lasso will help with the most common tuning issue facing DCS World VR Pilots running SteamVR
Keeping DCS World and SteamVR process on separate cores will eliminate some types of stutter and drag for VR users.
[CLICK HERE for a deeper dive video]
This does NOT apply to Oculus Rift users.
The Rift processes do not react well to Core restrictions and appear to manage to keep away from busy cores on their own.
CPU Core Binding Goals
- Lock DCS World to specific cores for on-going process management.
- Ensure the VR process keep away from DCS when running.
- Setup DCS to later ensure other windows processes do not impede either of those critical process groups.
Processes Initial Focus
- DCS.exe
- (Steam) VR Compositor
- (Steam) VR Server.exe
- Other Steam Services
Cores
- A (6) Core CPU running Hyperthreading shows (12) Cores.
- Core 0 & 1 being Physical Core 0 and it’s Virtual Core 1.
- All even cores are physical, all odd cores are virtual.
Enabling
Decide which two Cores to lock DCS into.
If you choose the top two Cores to lock DCS.EXE to, with Hyperthreading on, you would select Cores (8-9) (10-11).
To keep Steam processing away from DCS.exe, you would make those cores not available to the steam process. Simply by checking the boxes for all Cores and unchecking the boxes for (8-9) and (10-11).
- The best way to do this is to run the applications/SteamVR and DCS in VR mode.
- Run Process Lasso and find the processes noted above.
- Right-click on the process and select “CPU Affinity/Always/Select CPU Affinity”.
- Then walk through locking the process in or out of your chosen schema.
Process Lasso – Simple First Tune
This initial setup for Process Lasso will help with the most common tuning issue facing DCS VR Pilots running SteamVR
Keeping DCS and SteamVR process on separate cores will eliminate some types of stutter and drag for VR users.
[CLICK HERE for a deeper dive video]
This does NOT apply to Oculus Rift users.
The Rift processes do not react well to Core restrictions and appear to manage to keep away from busy cores on their own.
CPU Core Binding Goals
- Lock DCS to specific cores for on-going process management.
- Ensure the VR process keep away from DCS when running.
- Setup DCS to later ensure other windows processes do not impede either of those critical process groups.
Processes Initial Focus
- DCS.exe
- (Steam) VR Compositor
- (Steam) VR Server.exe
- Other Steam Services
Cores
- A (6) Core CPU running Hyperthreading shows (12) Cores.
- Core 0 & 1 being Physical Core 0 and it’s Virtual Core 1.
- All even cores are physical, all odd cores are virtual.
Enabling
Decide which two Cores to lock DCS into.
If you choose the top two Cores to lock DCS.EXE to, with Hyperthreading on, you would select Cores (8-9) (10-11).
To keep Steam processing away from DCS.exe, you would make those cores not available to the steam process. Simply by checking the boxes for all Cores and unchecking the boxes for (8-9) and (10-11).
- The best way to do this is to run the applications/SteamVR and DCS in VR mode.
- Run Process Lasso and find the processes noted above.
- Right-click on the process and select “CPU Affinity/Always/Select CPU Affinity”.
- Then walk through locking the process in or out of your chosen schema.
How To Conquer The Swap From Oculus To Reverb G2 or G1
After Completing this Setup
Continue Here
Components for an Oculus Pilot Converting to Reverb
Components you MUST have installed!
“What do I need to make the Reverb work in DCS World?”
“Do I need SteamVR if I’m running DCS Stand Alone?”
Good questions and a valid concern for pilots switching from an Oculus Device to a Windows Mixed Reality device such as the Reverb.
DCS uses SteamVR as it’s the compositor and essentially the drivers for connecting to your VR Headset. For Oculus users, this is done with the Oculus software supported by DCS.
There isn’t currently direct support by DCS for Windows Mixed Reality, you need to install and use SteamVR to get started.
Core Software Components
-
Windows Mixed Reality Portal
- Part of Windows 10, be sure you have updated to
Windows 10 2004 w/recent patches. <<<LINK - Install the Windows 10 2004 Update
- Part of Windows 10, be sure you have updated to
-
Windows Mixed Reality for SteamVR
- Available in the Steam Store. <<<LINK
- Highly recommend the BETA version of this important component.
- Without the Beta version, you won’t get the native resolution for the Reverb at 100% or advanced Reprojection Beta.
- Install the WMR for SteamVR, then enable the Beta version by Right-Clicking on the App name in your library.
- Select PROPERTIES
- Then enable via the BETAS tab.


-
SteamVR
- Available in the Steam Store <<<LINK
- Activated via the icon in the TOP of your Steam Main Screen
- Or clicking the Desktop Icon for WMR for Steam launches it too.
- NOT the Beta version!
These core components will get you started on the setup and tuning to follow.
Additional tools and utilities will be called out as needed in the
