
When I first joined the 231st Harrier Squadron as a part of JTF-1 (then CSG-1) – I was bombarded with – “If you’re VR, you have to get seat shakers! They are as immersive as VR, all over again.” 20 minutes of explanation later, links to the equipment on Amazon – I was on my way!
I hope you enjoy the added experience and immersion as much as I do!
- Everything you need to get started is here.
Take your time.
Be neat in your cabling.
Enjoy the results and immersion you add to your VR experience!
What is this?
Briefly, seat shakers are transducers added to your chair, desk, controls that along with a finely crafted piece of software, take the mechanical and aerodynamic movements of your jet in DCS and supply tuned frequency vibrations to your chair. This is NOT pumping the sound of your sim through your seat, that would not have the desired effect.
- When control surfaces move, you feel it.
- When gear moves and locks you feel it.
- When your speed-brake extends, you feel it.
- When you taxi over bumps and expansion joints, you feel them.
- When you land, eject, get hit by a missile, break your jet, fly too fast, too slow, launch weapons, yes – you feel it.
EXAMPLE Jet Events for the AV-8B-NA in DCS and Settings
I sourced this material from various places on the ED Forums and from my fellow pilots in the 231st. This is a consolidation of what I have learned and am sharing for your benefit.
What do you need?
- Dedicated Sound Out
- Cannot be shared with your headset, desktop sound out to speakers, etc.
- Again, this is NOT taking game sound and vibrating your chair.
- You “could” use Voicemeeter Banana, but I don’t recommend that unless you already know how to use it and have experience.
- Preferably a Sub Out on a sound card or similar. Can be a USB sound device (EX: BlasterX G1), the Sound Device on your motherboard (provided you aren’t using it for anything else), a new simple sound card in an available slot.
- Cannot be shared with your headset, desktop sound out to speakers, etc.
- Transducers (at least 2, maybe more)
- An Amp capable of driving the 2 or more transducers
- You may have an extra stereo amp hanging around, headphone amp, whatever the math works out to be on ohms and power required.
Your call. Recommendations listed below.
- You may have an extra stereo amp hanging around, headphone amp, whatever the math works out to be on ohms and power required.
- Various Cables to hook the PC sound out to the Amp and Transducers to the Amp.
- Screws to mount the transducers to your chair.
- A chair that is suitable for modifying.
- Accepting screws, allowing for cable management, etc.
- This is where your imagination and fabrication skills get to have some fun.
What are the parts?
I’m not going into all of the permutations or options you can have with this setup. This guide is just to get you going, and you can plan, tune, upgrade as you desire once it’s up and running.
Your implementation will be custom, as every Rig is different, you have varying degrees of available sound cards, etc. This is a LOT more simply done that you will think while looking at the list. Really is VERY simple.
Typical Hardware Listing
- At least (2) Transducers
- OPTIONAL: (2) Additional smaller Transducers if you want on-the-throttle and on-the-stick shakers.
- OPTIONAL: (2) Small Sub-Woofer External Amp(s) instead of one, depending on the number of transducers you are driving. (4+) Transducers, you may want one Amp per side or grouping.
- You can have as many as 6 channels (5.1) with the software. As many transducers as you want to power and wire. I would NOT start with this though.
- Cable: 3.5mm cable to 3.5mm, or 3.5mm to Stereo RCA, depending on your amp
- Various Cable Extensions depending on locations of devices
- Power Strip
- 5mm Audio Extension (if needed)
- RCA Extension (if needed)
- Speaker Wire
Lamp Cord will work just as well. Seriously. Physics works folks.
No Monster Cable required, save your pennies for more toys. - Zip Ties
- Screws
- Available nearby power for your Amp(s)
- OPTIONAL: Headphone 4-Channel Amp if you want to run multiple Amps and split and control the output for L/R and/or Seat/Stick shakers.
Software
Start with Andre’s Blog <<<LINK
(Both of the following applications are required for DCS and DIY SimShakers)
- DOWNLOAD LINK: SimShaker for Aviators (Freeware)
- DOWNLOAD LINK: SimShaker Sound Module (Payware)
Other Guides and Info
Hardware Example Amazon Links
Order from these links to help me pay for the Blog!
- Large Transducers Required [(1) For chair base (1) For chair back]
- ORDER FROM AMAZON <<<LINK
- Small Transducers Optional adds [Stick & Pedal shakers]
- ORDER FROM AMAZON <<<LINK
- Amp Example
- ORDER FROM AMAZON <<<LINK
- Headphone Amplifier Example
- Optional for more transducers and added level control
- ORDER FROM AMAZON <<<LINK
- Speaker Wire
- ORDER FROM AMAZON <<<LINK
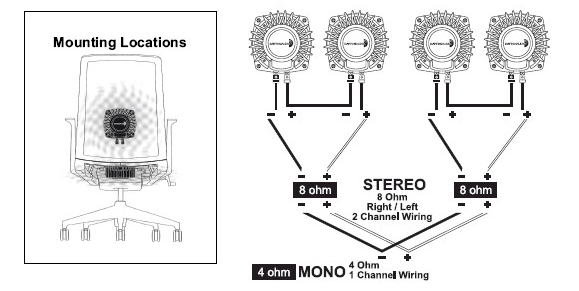
Example Setup
I sourced these from the Internet and from SNACKO on the ED Forums.
https://forums.eagle.ru/showpost.php?p=3080963&postcount=1


