
27.Mar.2021
Latest Updates
-
-
- SteamVR Setup Updates
- Inclusion of PD/RPE/CRM explanation
- Jabber’s Science Video on PD/SS% balance
- Screen Shot Updates for PD/RPE/CRM on-going…
-
Table of Contents
Quick Tips
Why do I have screen stutter, ghosting…etc.
-
- Clear out the Shader Caches in Saved Games
- Turn off Full-Screen Optimizations in Properties of the Sim’s .EXE.
- Cloud Drives mounted and active
- Nvidia CP Setup needs reviewing
- Ghost Monitors need to be turned off
- Game Mode is on – Turn it OFF
- Reprojection is OFF you may need to turn it ON
- My software isn’t updated
- Windows 10 isn’t tuned for VR
- My rig hasn’t been tuned or OC’d
- USB Power is low or too many devices in the chain
[get a USB PCIE Card] - Too many monitors on your video card
Tools to Make it all Work
- DDU – Start with clean drivers
- Easy to do, but follow the directions closely and plan ahead with your chosen driver version downloaded before you start
- fpsVR – FrameTime and FPS
- Performance detail Desktop and VR views
- Process Lasso – TBD
- ..to be continued
Common Questions
-
-
-
“I’m not running DCS via Steam. Do I need all this?”
-
“Does this work for Flight Simulator 2020?”
-
-
YES!
-
- DCS uses SteamVR as it’s compositor and essentially driver for connecting to your VR Headset
- Your headset needs this setup no matter the Simulator you will run after
- For Oculus users, this is done with the Oculus software also supported by DCS
- There isn’t currently direct support by DCS for Windows Mixed Reality, you need to install and use SteamVR to get started
- You don’t need to run the Steam gaming environment with it, you do need this setup with Stand-Alone DCS or Steam DCS
LINK: For the best experience, first, follow the Oculus to Reverb Setup
- This will ensure you have all of the necessary software to run the Reverb in DCS/FS20 for a First Time User or Oculus transfer
- Then, come back here and follow the initial setups for the device
- It is a requirement that you tune your Rig and OS for VR
- Out of the box Win10 drags simulation to it’s knees
- Follow the Rig Tuning Guides Closely
- This is a game of inches, not giant leaps
- Windows 10 Tuning
- Rig Tuning
- Skipping around generally means, oops, missed that, it’s not so great
Not doing the tuning means you’ve left up to 30% of available horsepower on the table and not in the cockpit. Flight Simulation is not your average VR Portal Game when it comes to Rig setup.
Please Join Us on the VR4DCS Discord for any questions you may have!
Links to Required Software & The Steps to a Good Install
-
-
-
Windows WMR Portal latest Windows 10 update
-
Software for this Walkthrough
-
-
- Windows 10 – [latest version]
- How to Check Versions (Below)
- LINK>> INSTALL
- Windows Mixed Reality Portal (WMR)
- Part of Windows 10
- Ensure you have the latest MSFT updates for WMR
- LINK>> WMR Portal
- Windows Mixed Reality for SteamVR
(WMR for SteamVR or Beta)- The Beta is not always required, often preferred
- Found in the Steam Store
- LINK>> WMR4SVR install
- SteamVR Release
- Found in the Steam Store
- You may need the BETA for some simulators
- (MSFS 2020 currently needs BETA)
- LINK>> SteamVR install
- Windows 10 – [latest version]
-
Check Windows 10 Version
-
-
-
Click the GEAR for Windows Settings
-
Click SYSTEM
-
-

-
-
-
Scroll down and Click ABOUT
-
-

-
-
-
Scroll down a bit until you see Windows Specifications and the info
-
You need AT LEAST 2004
-
-

Turn Off GAME MODE
-
-
-
Critical for DCS and MSFS 2020
-
Enter the SETTINGS: Home screen again and select GAMING
-
In the GAMING screen select Game Mode
-
In the Game Mode screen select Game Mode OFF
-
-


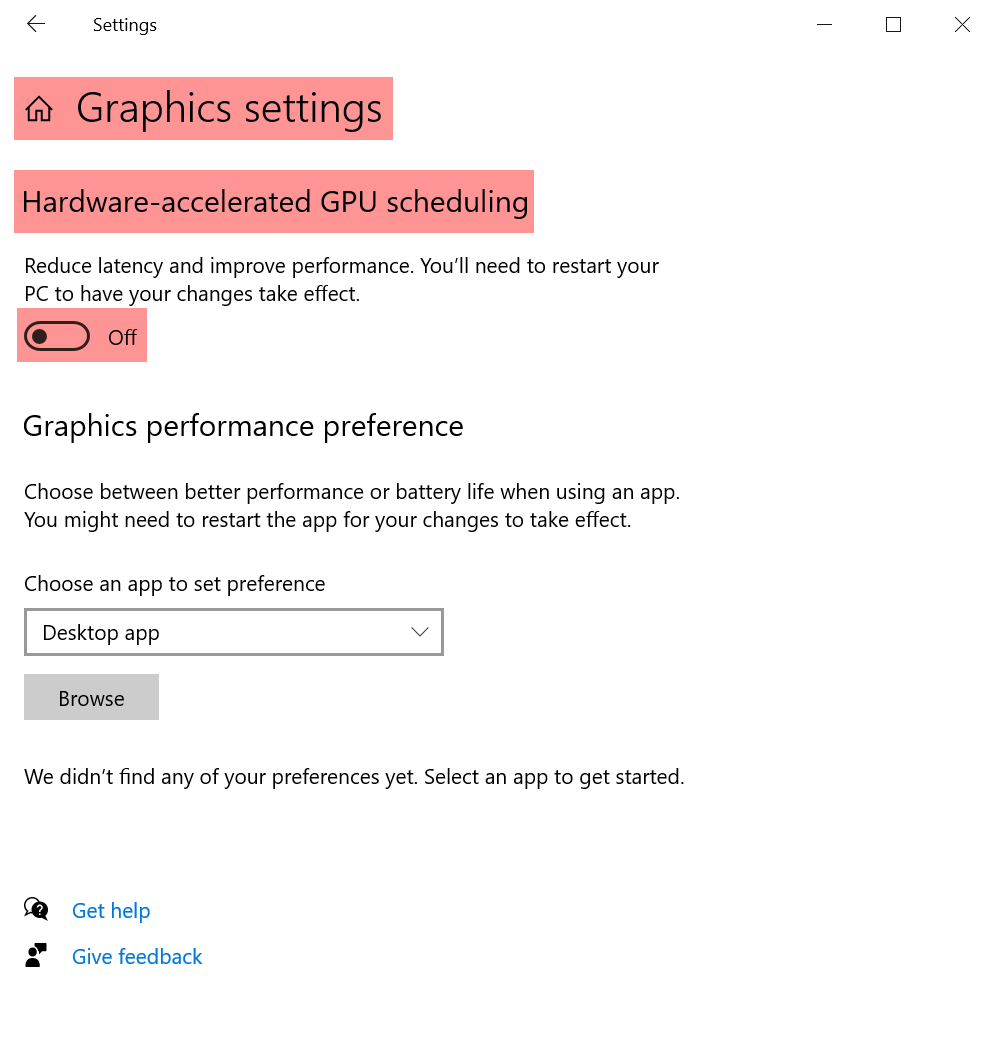
Turn off Hardware-accelerated GPU Scheduling
-
-
-
ONLY for the weakest Rig setups or untuned Rigs
-
Tuning far exceeds the benefits of this being on
-
Turn this OFF especially for DCS and MSFS 2020
-
-


Settings That Matter
-
-
-
If you want all the pixels, then you may not be able to add all the eye candy – horsepower matters
-
But we don’t like the jitter and sparkle around the edges that fit together
-
We compromise, we use tools to strike a balance between enough pixels to see things at a distance, and pixels mushed together for fewer jaggies and stop the sparkly things
-
The in-game tool suite was built for flat screens before 4K or 8K and 30xx cards came around to push pixels through the pipe
-
We don’t need much tuning to clear the view in VR, a bit for fine-tuning
-
-
GPU and CPU Frametime are the keys to Smooth
-
-
- You can use the built-in DCS Frametime display to show you how much you are degrading your smoothness. However, using the 3rd party “fpsVR” tool available in the Steam Store gives you a better display and more info
- “Lower Frametime is greater smoothness.”
- “Once you’re sustaining 35+ FPS, forget about FPS, manage Frametime”
- In the Frametime graphs
- Green/Yellow is Good
- Orange is OK
- Red is Bad
- You’ll need to watch both CPU and GPU Frametime and adjust your Super Sampling (SS) percentage and in-game graphics settings to see what configuration keeps you in the Green/Yellow area
- You may find yourself in a lot of Orange with Red spikes, still smooth but with variable play
This is where Reprojection can smooth things out - There instructions to turn this on and control Steam Reprojection, seen later in this doc
- MSFS 2020 See the MSFS 2020 Setup Doc for Reprojection
- If your Frametimes are in the teens range you’re golden
-
Important Notes & An Equation
-
-
-
DCS PD x Steam Video SS = A huge mush of your pixels and drag on your Rig power
-
HIGHLY recommend you set DCS PD to 1.0 and manage the view with SteamVR Per Application SS%
-
The current implementation of DCS PD is not as fine of a control as you get in SteamVR SS%
-
-
-
CAUTION
-
-
-
SteamVR adds a multiplier factor of 1.4 based on the individual HMD used when rendering the view
-
See this in action as you move the SteamVR SS slider from 100 to 150
-
Note the resolution of the rendered image it’s pushing is just below the slider
-
Start tuning by setting the slider to 100%
-
Then, with your new benchmarks of FPS and FrameTime, start tuning for clarity of view and smoothness using your tools
-
-
Where to Apply the Resolution Multipliers
-
-
- For WMR or SteamVR headsets, leaving PD at 1.0 gives you finer control using SteamVR SS% in tuning
- Using SteamVR Per-Application settings enables this control per application
- DCS.exe won’t show up for adjustment in the Application section unless it’s running in VR at the time
- The setup steps follow in the SteamVR section
-
A Necessary Tool for Tuning – “fpsVR”
@Yomo states and I agree, “Stop chasing FPS”
-
-
- Work for a picture you like and a smoothness in your gaming experience
- Then stop. Stop being the important part
- Frametime more equates to smooth a smooth experience than FPS
- The “fpsVR” Tool available in the Steam Store for about $4 can help you with what your GPU and CPU are doing with various settings.
-

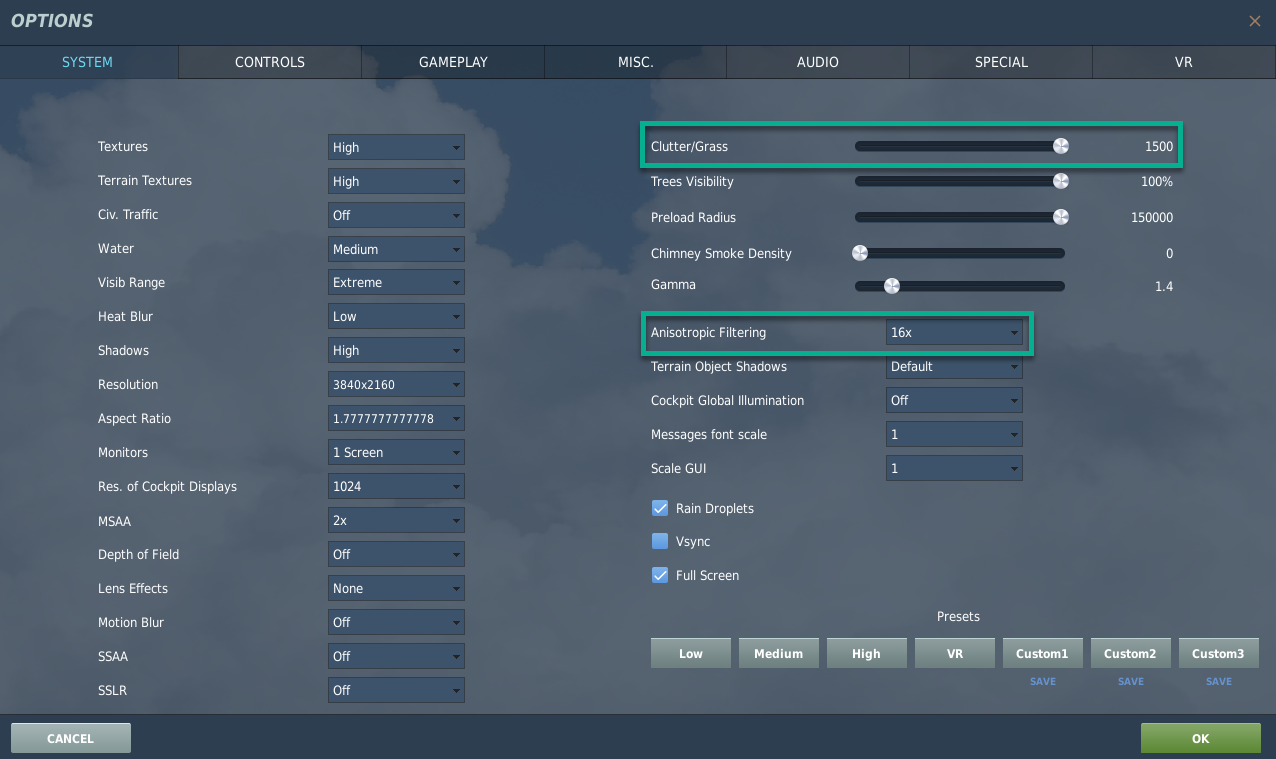
DCS Initial Settings
These are starter settings to get you to a known place to begin tuning.
From here, using the described tools and processes, you’ll start tuning for your unique Simulation Rig capabilities.
-
-
- Example Settings Below
- These settings change on my rig based on the most recent update and likely the direction of the wind for the day…
- NOTE: Anisitropic Filtering should be set to 4x 8x or 16x
- Without it, the lights and markings on the KC135 tanker are hard to see
- I have recently set Clutter & Grass to the max with no negative effects
- I have turned Reprojection OFF currently for the results below
- System Spec
- i9-9900k@5.2
- EVGA 3080 FTW3 Ultra
- 32 gig 3400 RAM
- M.2 Drive
- Reverb G2
- Results in MP
- FrameTime: High teens to low 20’s
- FPS: 55+ maxing at 90
- Small dips around busy airfields briefly to 45 fps
- No Stuttering
- No Frame Lagging
- Example Settings Below
-

SteamVR Settings
Setup SVR
-
-
- Settings Menu/Video – App Resolution/Custom
- Settings Menu/Applications – Setting the DCS.exe Custom Resolution
- G1/G2 at 100% to start tuning
- (DCS.exe only shows here when it’s running in VR)
- Watch the Jabbers Video below for an understanding of how the settings between DCS PD and SteamVR SS% function
- Example Per Application SteamVR settings are below (TBD)
- Developer – Enhanced Super Sampling – OFF/ON
- Try OFF first. When stable and smooth in flight, try changing it to ON
- Adds additional smoothing to antialiasing, but may induce artifacts or lag
- Either setting may make a difference based on your Rig capabilities
-
Jabbers Video Explaining the PD/RPE/CRM Relationship
Detailed Setup SVR
-
-
-
- Chose the Bars for the Menu
- Select SETTINGS
-
-


SVR General TAB
-
-
-
- Note the Resolution Per Eye (RPE) Setting
- A good starting point for tuning is 100%
Also makes the math easier when testing impact of your changes - The WHITE BAR in the slider is the system recommended setting
- SHOW Advanced Settings should be on
-
-

SVR Play Area TAB
-
-
-
- Not Required for DCS/FS2020
- Settings per personal preference
-
-

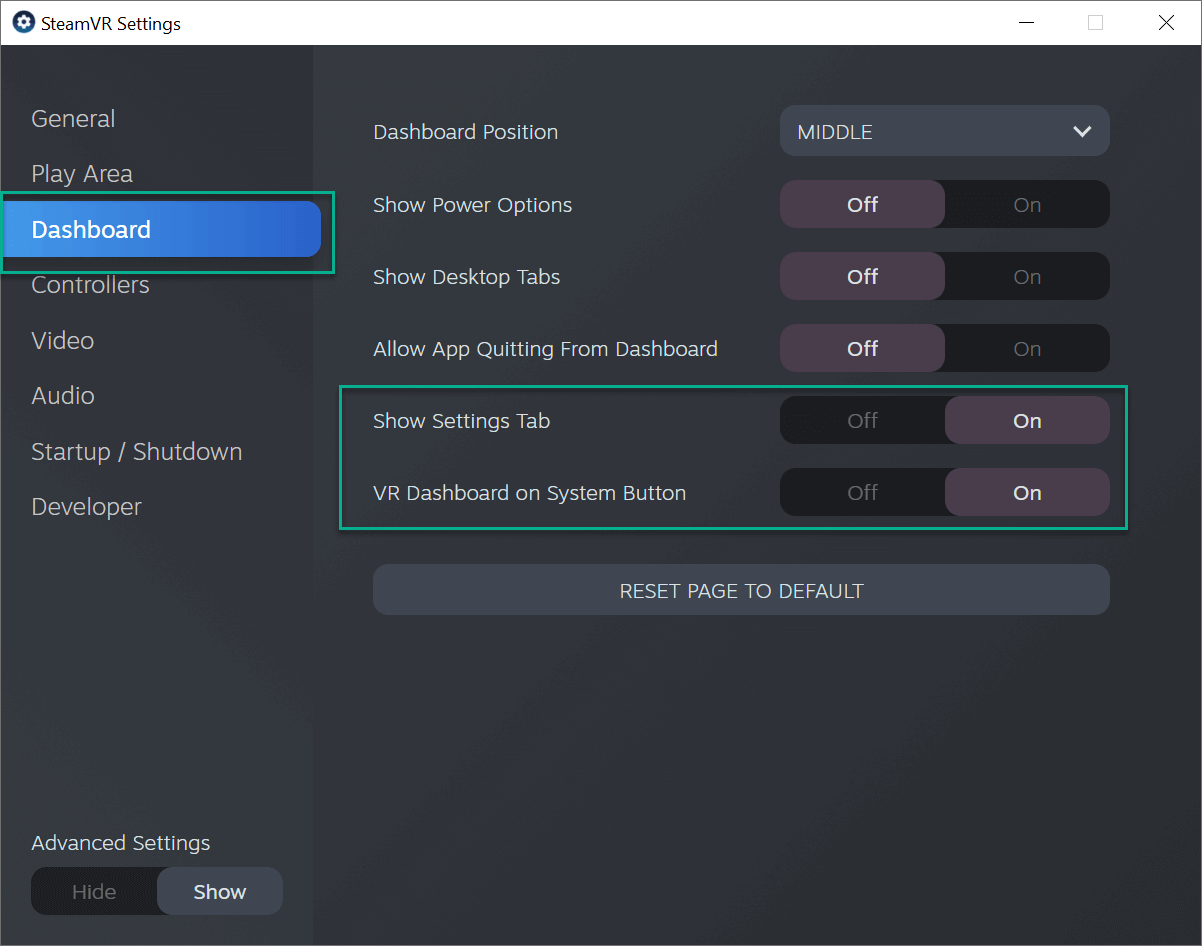
SVR Dashboard TAB
-
-
-
- Show Settings/VR Dashboard – A Path to Reprojection
- Setting these two sliders to ON will bring up in-VR WMR4SVR
menus allowing for Reprojection and other Settings - Once you’ve completed the setup,
return to this page to turn off the menu pop-up - With these ON, once you start SteamVR, the control panel will launch automatically and needs hand controllers to change settings
- Details on this covered in another post
-
-
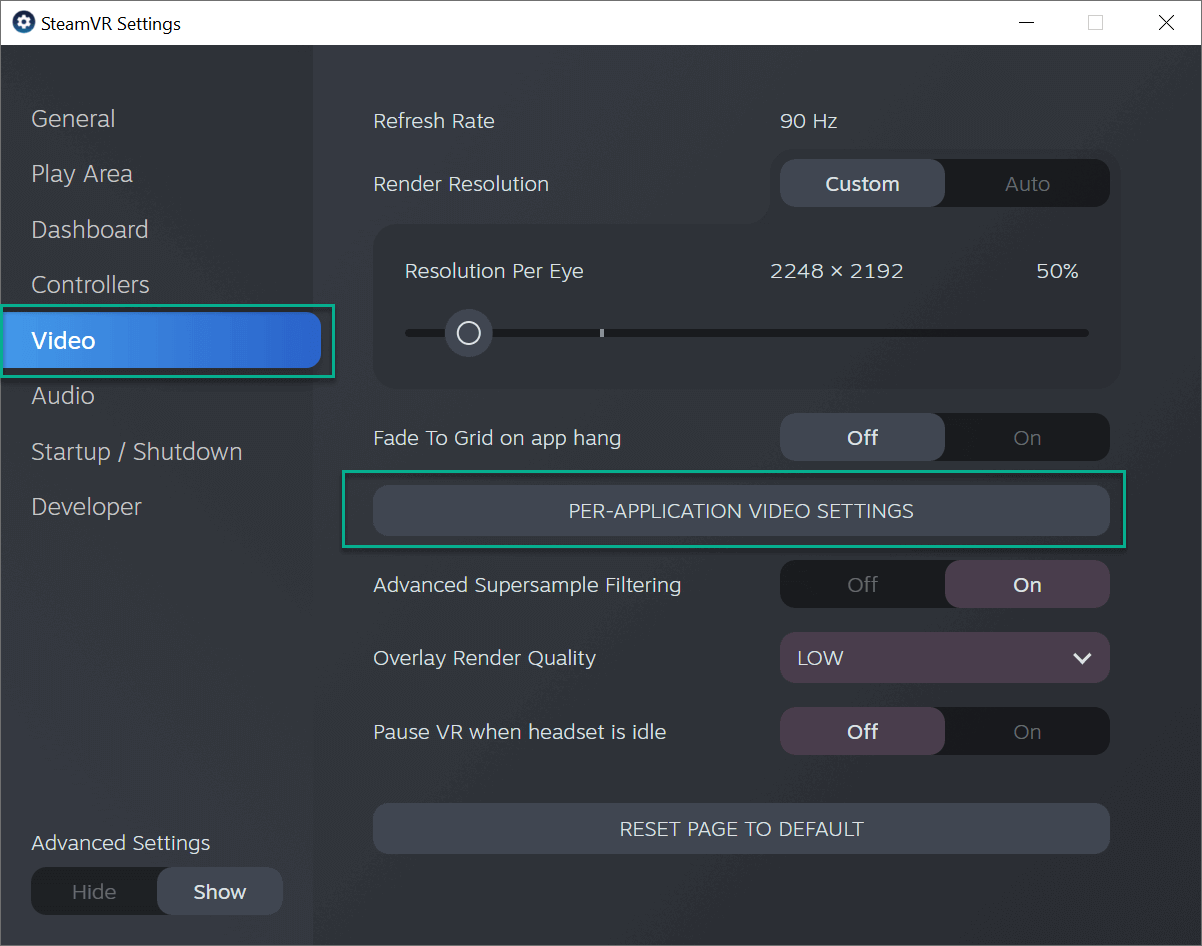
SVR Video & Per Application Settings TAB
-
-
-
- Per App/Game specific settings
- Settings for other sliders per recommended for a Simulation experience
- Try Advanced Super Sampling settings on/off to your view and experience preference
-
-
Jabbers’ SteamVR PD/RPE/CRM Spreadsheet
-
-
-
- Examples per VR Headset and resulting resolution changes.
- A calculator to determine the true resolution displayed per settings.
- >>> CLICK >>>
-
-

SVR Audio TAB
-
-
-
- Setting HEADSET will automatically switch to Mic/Speakers in your HMD when running a game
- Manual lets you choose in WINDOWS Sound Manager by application
- Recommended Settings in not using a separate headset with your HMD
-
-

SVR Startup/Shutdown TAB
-
-
-
-
- Recommended Settings
-
-
-

SVR Developer TAB
-
-
-
-
- Current OpenXR Runtime: WMR
- Required for MSFS 2020
- Not Required for DCS
- Current OpenXR Runtime: WMR
-
-
-

SteamVR Developer MENU
-
-
-
- Back to the SteamVR Floating Menu
- Select Menu Bars / Developer / Developer Settings
-
-

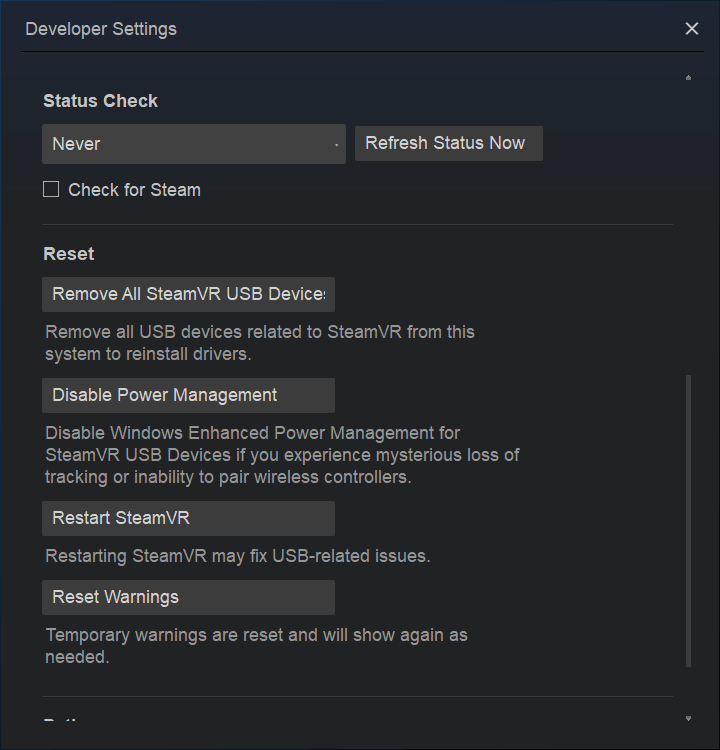
SVR Developer SETTINGS
-
-
-
- Settings As Displayed
-
-


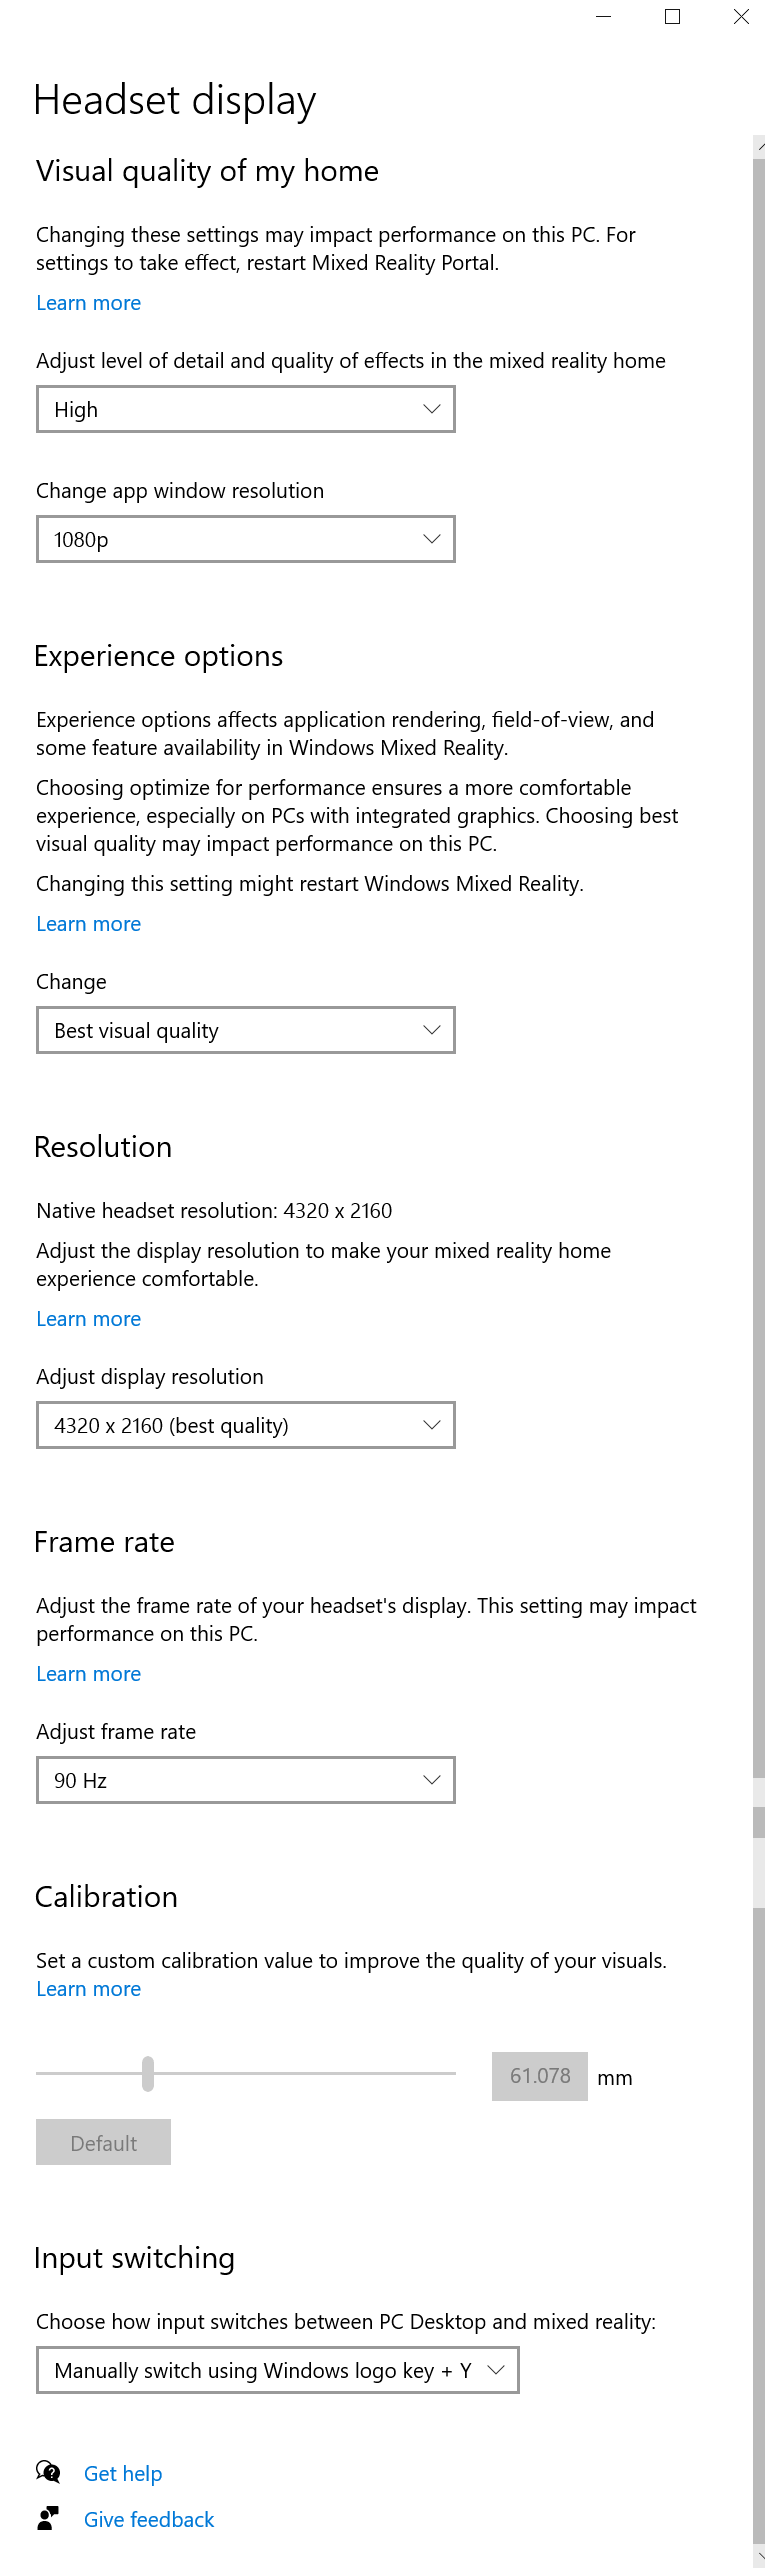
WINDOWS Mixed Reality Portal Settings
These settings are recommended for higher-powered and well-tuned VR Simulation Rigs, as is the purpose of this blog.
Systems not meeting these specifications may want to choose AUTO for many of the settings.
This blog does NOT recommend 60Hz in any case. Visuals are degraded significantly. Needing to set this indicates upgrades are needed in your Rig.
GENERAL
-
-
-
-
- Windows MR Settings (In the Windows MR Portal Settings Menus)
- Visuals – High
- Calibration – Your IPD
- G2 as per SLIDER on the Headset
- G1 Set here
- Experience Options – 90Hz
-
-
-

WMR Settings
Audio
-
-
-
- When using the integrated mic and headset, choose these two options.
The audio will automatically switch to the headset then active - Generally, the Audio devices are labeled as follows when selecting where your app should send audio
- Speakers (Realtek USB2.0 Audio)
- Microphone (Realtek USB2.0 Audio)
- When using the integrated mic and headset, choose these two options.
-
-

WMR Settings – Environment
-
-
-
- This option is for clearing your boundary settings should you need it.
-
-

WMR Headset Display Settings
-
-
-
- Recommended for higher-powered simulation Rigs
-
-
Nvidia Control Panel
-
-
-
- Follow the Nvidia Control Panel Settings in this Blog Post.
- These are set for best visuals
- Lower powered Simulation Rigs may have issues with these settings.
-
-

Turning on MotionVector [Reprojection] in WMR4SVR
-
-
-
REMINDER: WMR4SWVR is Windows Mixed Reality For SteamVR
-
You only have this available if you are running a WMR headset
-
-
Motion Vector in VR can make up for highly variable frame rates and smooth out your play
-
It is often associated with visual artifacts
-
Consider it a compromise of smooth play and visual acuity – your mileage may vary
-
The settings are now accessed via the SteamVR Setting Console while In VR
-
-
Enable WMR Motion Reprojection – Option 1
[Thanks to Noxyd in the VR4DCS Discord for pointing this out!]
-
- Navigate to the MixedRealityVRDriver Folder noted:
- (X):Program Files (x86)SteamsteamappscommonMixedRealityVRDriverbinwin64
- Run: OpenVRSettingsUX.exe
- Choose the Graphics Tab in the window
- Default SteamVR app motion reprojection mode
- Allows you to choose a Reprojection mode per VR application
- DCS only shows up here when it is RUNNING in VR
- If you select this option, new settings appear in the SteamVR/Settings/Graphics Tab for managing per-app Reprojection
- If NOT selected, these settings will apply to all VR Applications
- Reprojection Status
- Auto – Runs When Needed
- Motion Vector – Always On
- Disabled – OFF
- Force DX11 Mode
- IF you have native DX11 installed, this will use DX11 rather than rely on DX12’s DX11 compatibility mode.
- See this Article for Installing DX11
- Navigate to the MixedRealityVRDriver Folder noted:

Default SteamVR app motion reprojection mode settings
- Manage Video Settings For:
- Drop Down to choose the app you want to specify Reprojection status for
- Here DCS is running and shows up for adjustment
- Custom Resolution Multiplier
- Setting the running SteamVR SS% per application

Motion Smoothing Dropdown
Options as noted
- USE GLOBAL SETTING – Follow the top-level setting (Default)
- Enabled seems to mean AUTO
- Disabled – OFF
- Force Always-On – ON

Enable WMR Motion Reprojection – Option 2
Enabled while in VR
- In SteamVR Settings
- Go to the Dashboard Tab
- Enable: ON
- Show Settings – On
- VR Dashboard on system Button – On
- This will bring up the SteamVR settings tab in the HMD when SteamVR starts after WMR4SVR.
- Enable: ON
- After you complete the setup for Motion Vector in SteamVR, via the steps below, come back to SteamVR Settings: Dashboard and turn both of these OFF
- Go to the Dashboard Tab

-
-
-
Once inside SteamVR, you should see this screen
-
Click the WMR4SVR Control in the bottom left to get you to the settings you need
-
-

-
-
- If the menu doesn’t appear, try clicking the Menu Button
(raised thumb button) on your right controller- (If yours is mapped differently, try other buttons)
- If the menu doesn’t appear, try clicking the Menu Button
-

-
-
-
The initial INPUT screen should appear
-
Note the controller menu button choice as displayed
-
-

-
-
-
In the WMR4SVR Settings Screen Click GRAPHICS
-
NOTE: The menu button selected to Open/Close the Dashboard
-
-

Motion Vector Settings
-
-
- Auto – Turns on when the system meets the need
- Motion Vector – Always On
- Disabled – Off
- Force DX11 Mode: I don’t see a difference in testing
Normally I leave this OFF
-

-
-
-
After setting Motion Vector to your preference, restart SteamVR
-
Be sure SteamVR has exited all the way out by checking Task Manager or just restart your system
-
-

Thanks for all that great info Thud!! I think I got most of it right on my G2.. I agree with others that a update and adding OpenXR would be a great help. I just set everything up for SteamVR as this guide shows. I want to see how it compares to OpenXR, because I really want to be able to use OVRToolkit and fpsVR. Thanks again!
LikeLike
This guide was fantastic but I think it now needs to be updated to explain OpenXR alternative options and SteamVR by-pass.
LikeLike
Hi
Excellent guide. I have used it extensively and managed to set myself up very nicely. Thank you for kindly having these out in the open.
A few questions if I may. Is there a particular reason to force IPD distance of 55 and how did you decide on MSAA mask size of 0.50.
LikeLike
What about experience options (performance or visual quality?). which should i choose?
LikeLike
Thanks for all this info, much appreciated !
LikeLike
Wow! Astonishing work!
LikeLike
A one stop VR guide. Well done.
A fellow YouTuber concluded that NVCP has no effect on VR: https://www.youtube.com/watch?v=hipoAXasWeI
NVCP may in some cases actually cause a decrease in fps, but it’s not completely conclusive. But aside from NVCP, your Win10, WMR, and SteamVR settings are a great benchmark for the VR community.
LikeLike
Thanks for this man. I just got HP reverb G2 on a 3070TI I followed the steps here and got a worse picture, stability and performance which frustrated me for days. Resetting Nvidia back leaving and raising the DCS back to 1440P and higher resulted in better experience and visuals were massively improved gfx and stability. My take is have a baseline. DCS PD at 1.0 and SteamVR on Auto worked fine keeping me above 55+FPS average was down to 35 on very low settings. I will mess with the steam setting for now I have a known good config which I think new VR users need to establish. Seems impossible to truly say what your settings should be as some are on 10XX 20XX and 30XX what can be left on seems to very. I am new to VR and have a tendency to min max setups but I gave up and accepted for now It looks good at 1440P with most visuals on like my flat panel.
LikeLike
If the ingame PD is such a drag on performance, why not just leave it at the minimum 0,5 and do everything by supersampling? Is there a quality difference?
LikeLike
I’m not 100% sure but wouldn’t setting it 0,5 cause additional processing for downscaling? I think a setting of 1,0 means it’s basically disabled and there is no extra software processing
LikeLike
[…] the rest of the Rig Tuning and Headset Tuning to get all the pixels […]
LikeLike
[…] Continue Here […]
LikeLike