
The consolidated information here is made possible by the pilots in JSF-1 and in the DCS community whose curiosity and dedication to our hobby lead the way to the best experiences. This is their effort consolidated into a workable document. We hope you can benefit from the collective brainpower.
Carry On! = Thud =
The Steps to a Good Install
- Ensure you have the four critical pieces of software installed!
<<<CLICK HERE - Select the settings in this document for your initial run.
(SEE BELOW) - Review the Pre-Flight for start-up once your settings are complete
<<<CLICK HERE
REQUIRED SOFTWARE for this WALKTHROUGH
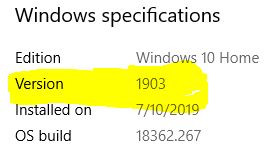
- Windows 10 – 1903 (with recent patches)
- How to Check (Below)
- INSTALL <<<LINK
- Windows Mixed Reality Portal: (WMR)
- Part of Windows 10
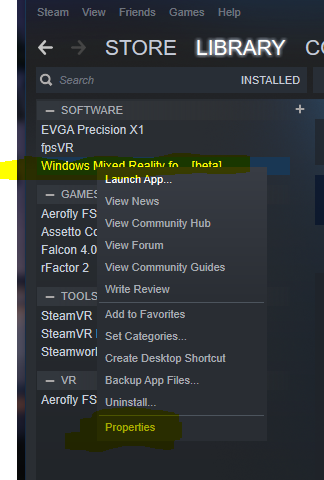
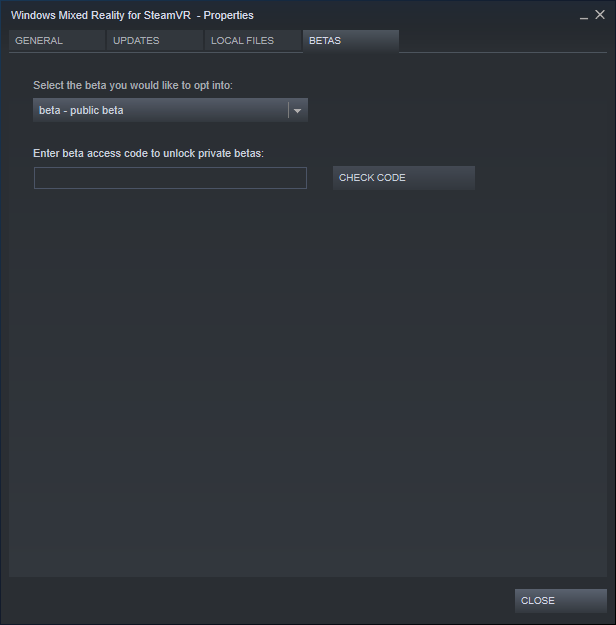
- Windows Mixed Reality for SteamVR BETA: (WMR for SteamVR Beta)
- The Beta is REQUIRED to see the Reverb in close to Native Resolution
- Found in the Steam Store (free) <<<LINK
- After installing, you must then install the BETA <<<LINK to Steps to Install
- SteamVR Release:
- Found in the Steam Store (free) <<<LINK
- DO NOT INSTALL THE BETA
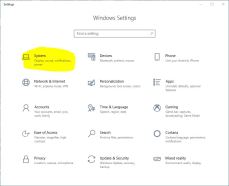
How do I know which version of Windows 10 I have?
- Click the GEAR for Windows Settings
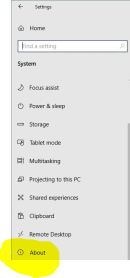
- Click SYSTEM
- Scroll down and click ABOUT
- Scroll down a bit until you see Windows Specifications and the info you need.
Which Settings Matter – A Primer
Anything other than native resolution is a degraded picture.
If you want all the pixels, then you cannot add the eye candy. But we don’t like the jitter and sparkle around the edges that fit together. We compromise and we have good tools to strike a balance of pixels to see things at a distance and pixels mushed together to see circles and stop the sparkly things. This in-game tool suite was built for flat screens before 4K or 8K and 2080ti cards to push pixels through the pipe.
We don’t need much of it in VR, though some for fine-tuning.
GPU and CPU are keys to Frametime
You can use the built-in Steam Frametime display to show you how much you are degrading your smoothness. However, using the 3rd party “fpsVR” tool available in the Steam Store gives you a better display and more info.
“Lower Frametime is greater smoothness.”
In the Frametime graphs, Green/Yellow is good. Orange is OK. Red is bad.
You’ll need to watch both CPU and GPU Frametime and adjust your Super Sampling (SS) percentage and in-game graphics settings to see what configuration keeps you in the Green/Yellow area.
You may find yourself in a lot of Orange with Red spikes, still smooth but with variable play. This is where Reprojection can smooth things out. There is a file change that allows you to turn this on and control Steam Reprojection, seen later in this doc. If your Frametimes are in the teens range you’re golden. Try not to run with lots of Red.
Important Notes & An Equation
DCS-PD x Steam Video SS x Steam App SS = A huge mush of your pixels and drag on your comp power.
The current implementation of DCS-PD is a massive drain of GPU/CPU. Using SteamVR as much as you can for tuning will save you cycles for gameplay and turning on more eye candy.
CAUTION
SteamVR adds a multiplier factor of 1.3 or other, based on the individual HMD used, to the rendered view. See this in action as you move the SteamVR SS slider from 100 to say 150. The resolution of the rendered image it’s pushing is noted just below the slider. Get the rez display here as close to your native rez as you can. Then, using your new benchmark start tuning for clarity of view and smoothness using your tools.
You need to decide where to apply the SS factor
Adjust the SS in Video SS (Global) or in the Application SS section specific to your game in the SteamVR Application Settings. Not both. Both is a multiplier and will zap your horsepower ASAP.
Applying these settings in SteamVR seems to have less of a drag on your CPU and GPU than using the PD Slider in the DCS VR Tab. PD does essentially the same thing in DCS but not as efficiently.
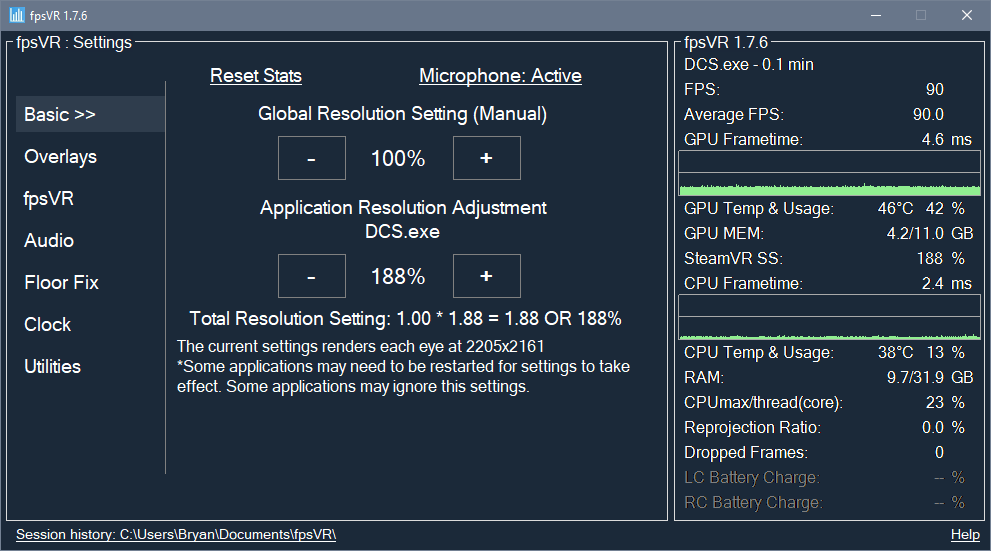
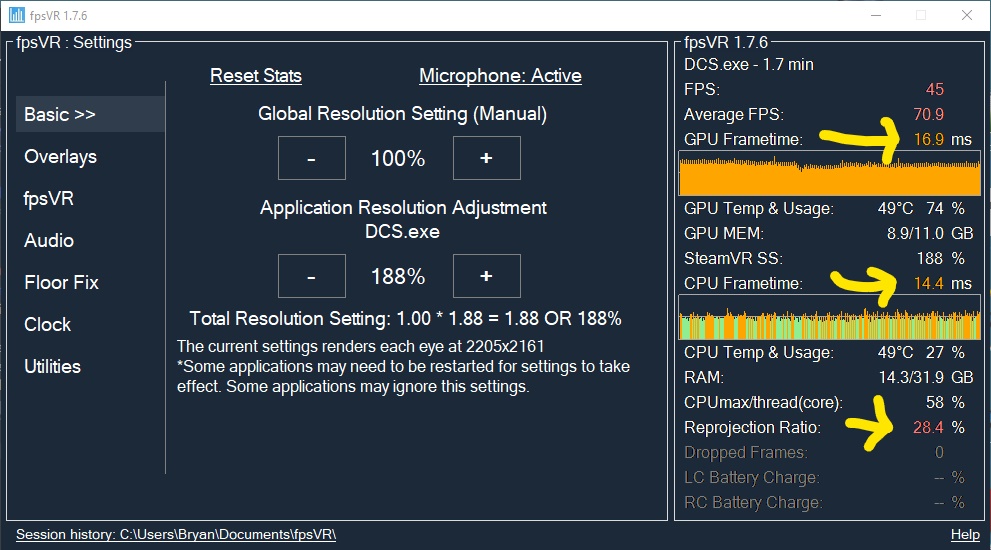
A Necessary Tool for Tuning – “fpsVR”
@Yomo states and I agree, stop chasing FPS. Work for a picture you like and a smoothness in your gaming experience. Then stop. Stop being the important part. Frametime more equates to smooth a smooth experience than FPS.
The “fpsVR” Tool available in the Steam Store for about $4 can help you with what your GPU and CPU are doing with various settings.
- “An example of “fpsVR” showing FrameTime and other data when at rest, in the Menu Page in DCS using Odyssey+ settings”
- An example of “fpsVR” in DCS flight, with settings for an Odyssey+
- Reverb settings would be 100% and 100% to start.
DCS Initial Settings
- DCS
- Visibility Range – HIGH or Ultra
- MSAA – NONE or 2x if you can’t live with jaggies and sparkle.
- 4x will likely be too much drain on your system
- It’s easier on your system to raise the SS% than to use MSAA
- SSAA – NONE
- Clutter/Trees – MAX
- Preload Radius – ~100k or MAX
- Anisotropic Filtering – 8x or 16x
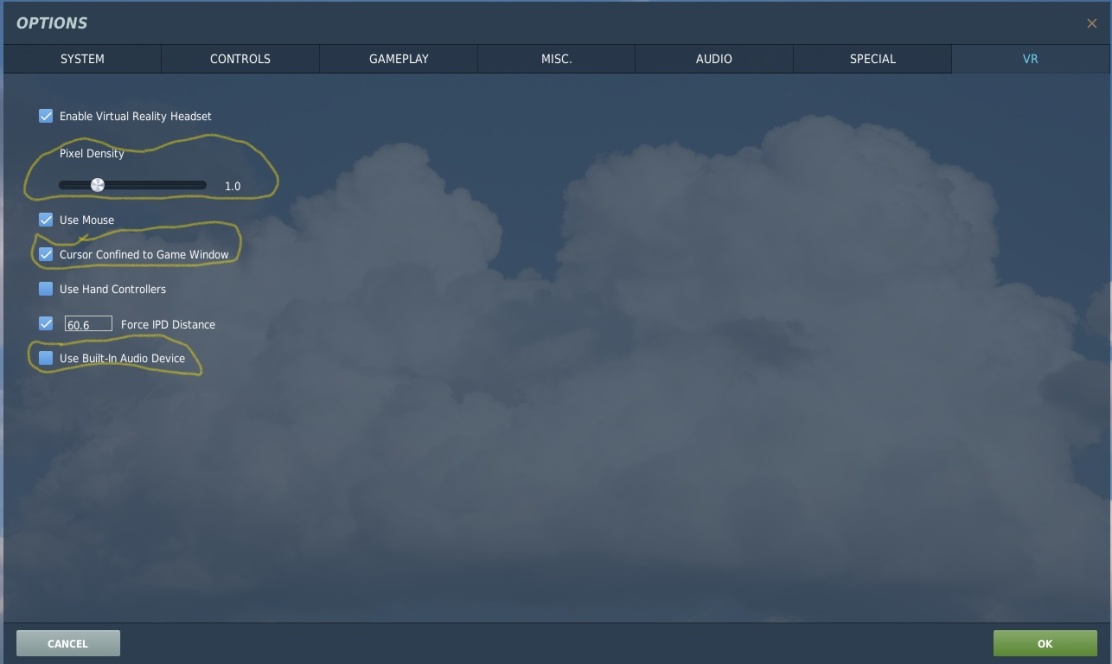
- Pixel Density – ONE
EXAMPLE: DCS Options Settings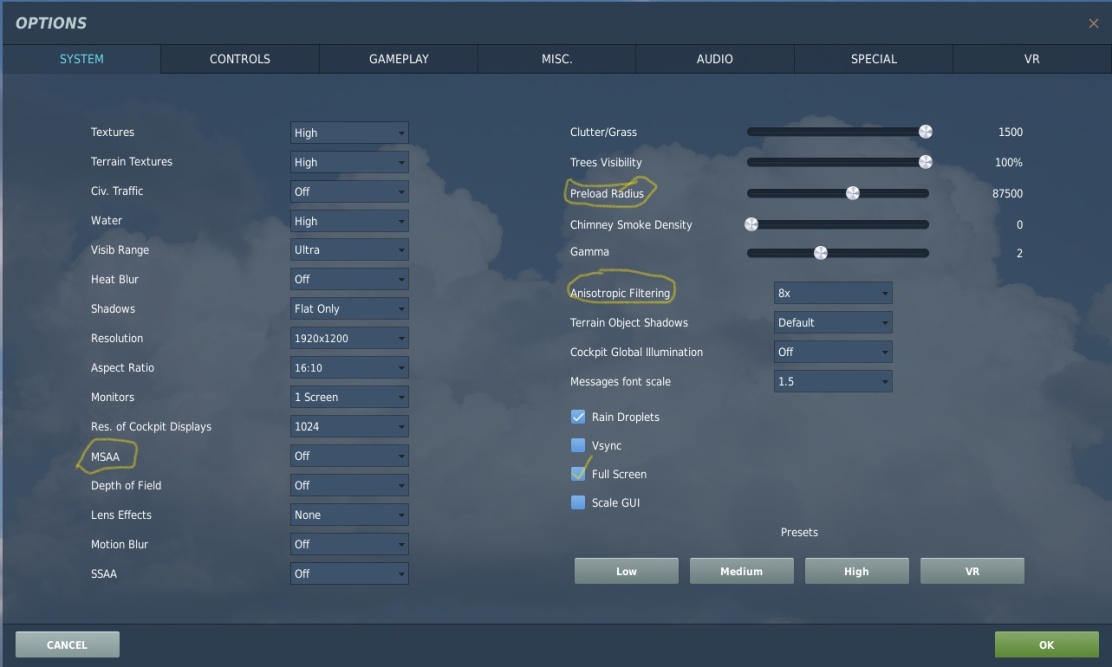
SteamVR Settings
(In the SteamVR Settings Menus)
- Settings Menu/Video – App Rez/Custom 100%
- Settings Menu/Applications – DCS.exe Custom Rez @ 100%.
- 100/150/200% and points in between depending on your system.
- (DCS.exe only shows here when it’s running)
- Developer – Enhanced Super Sampling – OFF/ON
- Try OFF first. When stable and smooth in flight, try changing it to ON.
- Either setting may make a difference for you based on your Rig capabilities.
“Reprojection On” appears when enabled in the Steam.VR.Settings file. See Instruction Below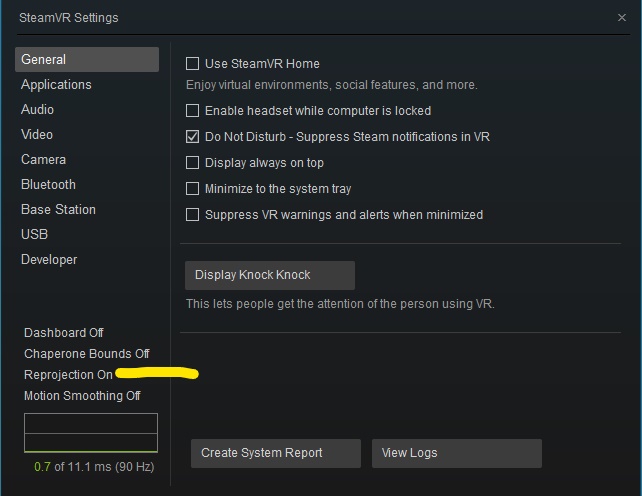
Optional: Some see improved graphics with this set on.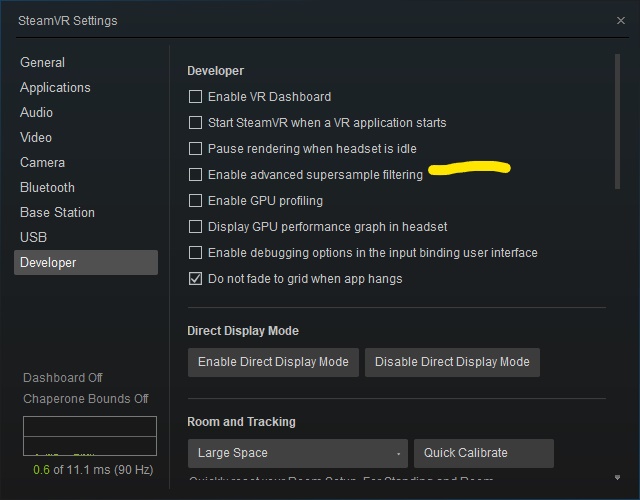
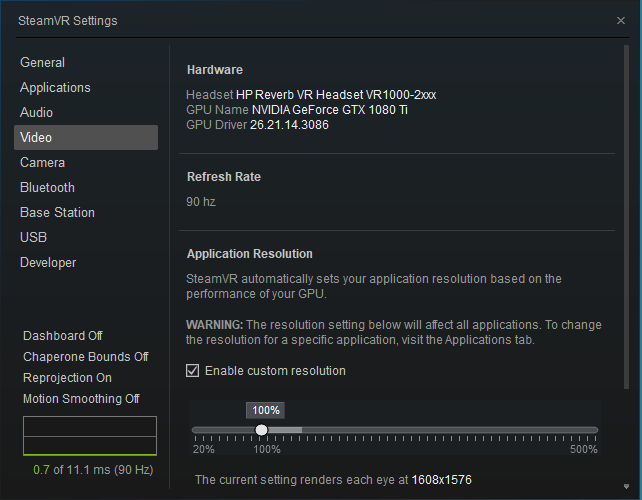
NOTE: At 100% for DCS.exe the render is close to the 2160×2160 native rez of the Reverb & higher. This accounts for the distortion factor in image projection. Higher than native rez is better than lower.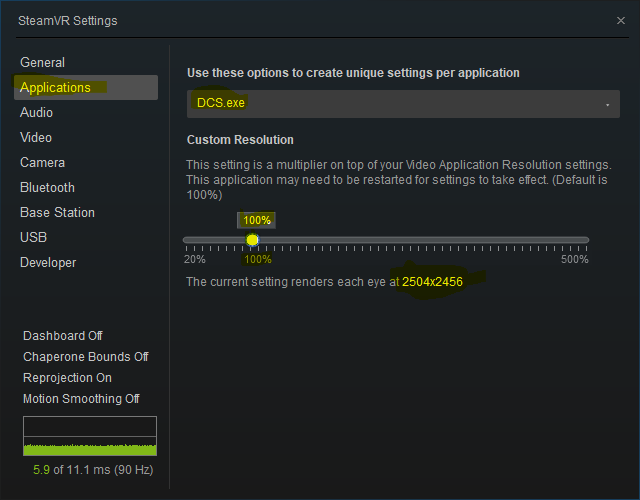
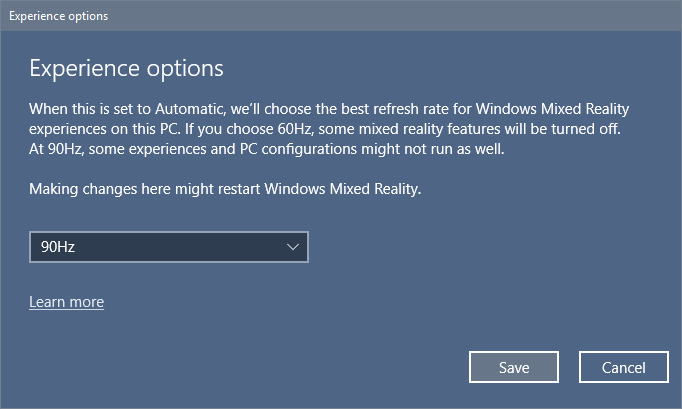
WINDOWS Mixed Reality Portal Settings
- Windows MR Settings (In the Windows MR Portal Settings Menus)
- Visuals – Very High (beta)
- Calibration – Your IPD
- Experience Options – 90Hz

- Nvidia Control Panel
- Set Virtual Reality pre-rendered frames: 3
- Set Power Management Mode: Prefer Maximum Performance
- Set Shader Cache: ON
Windows 1903 & Patch Info
Windows 1903 Update (After 07/09/2019)
https://www.microsoft.com/en-us/software-download/windows10
After installing Windows 10 1903 (patched) you’ll have access to new options for WMR as well as direct support for Reverb native resolution. Increasing your clarity with a lower load on the GPU. (The loading part at this date needs more testing to confirm.)
To activate the updates in SteamVR, you’ll need to install the following BETA version of “Windows Mixed Reality for SteamVR”, then adjust your SS% settings for DCS.exe in the SteamVR Application section.
Enabling New Advanced Reprojection
You MUST have installed the WMR for SteamVR Beta before proceeding! (CLICK HERE)
Settings to change in the Steam.VR.Settings File
This turns on an advanced Reprojection mode that will smooth your experience even more. It is close to or better than the Oculus implementation as of this date.
File Location:
\Program Files (x86)\Steam\steamapps\common\MixedRealityVRDriver\resources\settings
File: default.vrsettings
- In this file, the highlighted lines are commented out with //
- Remove the // and restart Steam and SteamVR.
- Optional: If you DO NOT want the indicator to show in your HMD, don’t uncomment the line for the Indicator. // “motionReprojectionIndicatorEnabled” : true,
- No need to removed spaces and yes the quotes need to stay in place.
{
“driver_Holographic” : {
// Increase back buffer size so that larger superscale values do not get a resolution reduction
“renderTargetScale” : 2.0
},
“driver_Holographic_Experimental” : {
// “motionReprojectionMode” : “auto”,
// Motion reprojection doubles framerate through motion vector extrapolation
// motionvector = force application to always run at half framerate with motion vector reprojection
// auto = automatically use motion reprojection when the application can not maintain native framerate
// Automatic motion reprojection indicator to display the mode currently selected
// green = off because application can render at full framerate
// light blue = on because application is cpu bound
// dark blue = on because application is gpu bound
// red = off because application running at less than half framerate
// “motionReprojectionIndicatorEnabled” : true,
// Some people may experience increased discomfort such as nausea, motion sickness, dizziness,
// disorientation, headache, fatigue, or eye strain when using thumbstick controls in Windows Mixed Reality.
“thumbstickControlsEnabled” : false, // true = use thumbsticks for artificial turn/move, false = default application thumbstick behavior
“thumbstickControlsReversed” : false,
“thumbstickTurnSmooth” : false,
“thumbstickDeadzone” : 0.25,
// During some transitions (typically entering Home), controller events start accumulate and the system has difficulties to catch up
// Settings a mximum age for a contoller input allows ensuring that the events queue does not grow indefinitely
“obsoleteStateMaxTimeInSeconds”: 1.0
},
“NoInterEyeRotation” : {
“DOOMVFRx64.exe” : true
}

congratulations !!!! nice tutorial!!! !!!!!!
LikeLiked by 1 person
congratulations !!!! nice tutorial!!!
LikeLiked by 1 person
Thanks a million. I’m getting my revervb today.
LikeLiked by 1 person
Thanks for the good word! We’re here so you can get the best out of your device! Any questions, our Discord Channel is a great way to get help.
LikeLike
Hello, very good guide, thanks… but i’m not sure if for DCS I must use steamVR, WMR for steam, or both at same time. I want the new reprojection.
LikeLiked by 1 person
HI! – Check the Preflighting Section, that can help you get all the right parts to start.
You need WMR Portal (Microsoft), WMR for STEAMVR-Beta (Steam), SteamVR (Steam), and with the file adjustments noted in the Reverb Setup section, you’ll be able to turn on Reprojection.
https://vr4dcs.com/2019/08/19/preflighting-wmr-steamvr-for-dcs/
https://vr4dcs.com/2019/08/01/reverb-settings-for-dcs/
LikeLike
Great guide Thud!
Question. Isn’t is best to configure SS in steamVR close to native resolution of the reverb rather than at 100%, which is considerably higher? The reverb already has some pretty good clarify at native resolutions.
LikeLiked by 1 person
I’ve recently seen this vary a bit and I”m not sure why. I recommend checking:
Be sure you have Windows 10 1903 and updates, and WMR for SteamVR (Beta).
(NOT SteamVR Beta)
The 100% in Video setting and 100% in App (DCS) setting should be close to native, slightly different due to accounting for the distortion factor.
LikeLike
Hey Thud, correct me if I am wrong but I will only see reprojections on when it is active at that specific time? I have had it listed as being on sometimes and at others it’s been off. I’ve always had the reprojection display on since manually changing the VR Settings file though. Sometimes while in DCS I’m any of the four colours or perhaps both GPU and CPU bound at the same time.
LikeLike
It’s displaying reprojection there now after I fiddled around a bit, I did have both betas, not sure what it was but thanks again. I’ll be spending quite a bit of time on your blog getting things setup.
LikeLiked by 1 person
Excellent! Glad to here this helps, the feedback is important so we can keep up with the needs of the community.
LikeLike
I have followed the instructions for switching on reprojection (removing the //) however I have just noticed that I am not seeing this reflected in the Steam VR settings menu below Chapperone, nor am I seeing any motion smoothing display. I’m on Steam VR beta 1.7.8. Is that normal? Thanks in advance for your help.
LikeLike
Have you installed the Beta version of WMR for SteamVR? That’s required to pick up the beta reprojection.
Though I don’t recommend SteamVR Beta, have not had good results with that version.
LikeLike
Thanks heaps, I needed this consolidation of info. There’s just too much BS out there for a novice like me to try and filter. I appreciate your help.
LikeLiked by 1 person
Thanks!
LikeLike
Wish I’d seen the above sooner. Your guidance jives with my experience. Just took me months to get there. Odyssey+ user here.
LikeLiked by 1 person
Thank you! That’s exactly why this blog was built!
The guide should be good for any WMR Headset, getting to the solid starting point and tuning from there.
LikeLike
[…] These core components will get you started on the setup and tuning to follow. Additional tools and utilities will be called out as needed in the Initial Settings Section. […]
LikeLike