
[WIP – Graphics to Follow Shortly]
Tuning your Game Rig means optimizing the money you’ve already spent to get the performance you need.
Some simple steps with excellent videos from the community can get you higher frame rates, better frametimes, and an overall a much smoother in-flight experience. Smooth is the name of the game, FPS won’t do much for you if you can’t sustain it for the fight.
Basic OS Tuning
Windows 10 contains a huge amount of overhead in the form of processes you aren’t using. Every bit of this adds to the opportunity for lag, reduced resources for DCS, and a guaranteed less than optimal experience.
Overclocking
Tools today make it easy to get at least some additional performance out of your hardware with minimal risk, maximum reward.
Network Management
This will affect your performance greatly in a multi-player environment. Even in the single-player environment, Network services (cloud connections, backups, poor connections) will drag your Rig and produce jitter, frame lag, or worse.
This guide assumes you are running a dedicated gaming rig. As such you’ll need to take heed of some of the processing being turned off, in case you do use them for other than gaming purposes. But probably not…
Step 1: Benchmarking
You need to know where you are in some measure to understand what effect your tuning is having, and where tuning may be most effective for your situation.
Have some paper and a pen handy to jot down the results of your Benchmark runs.
You think you’ll remember, but you won’t. Each run should have some notes about what was adjusted and to what degree. Nothing fancy, just enough for you to remember what changed and what the result was for the effort.
Create a folder in a directory you can find, where you will store screenshots of your results.
These will be produced by the benchmark software or by you taking screenshots with the Snipping Tool provided in Windows 10.
Graphics Benchmarking Tools
One of the easiest to use is by UNIGINE and their tool called Heaven.
This tool will exercise your Rig and show the stress it’s capable os sustaining for your GPU performance. Note that this is greater than the stress DCS will place on your system, but as it’s DX11 based (as is DCS at the moment) it gives an accurate representation of capability in-game.
Run the utility.
When the menu appears select EXTREME.
Once the screen begins to move about, press F9 to start the Benchmark run.
As the Benchmark starts to run, touch nothing! Let it run to the end.
When complete, you can save the results or take your own screenshot for a later compare.
**Ensure you’ve turned off any screen savers and stopped any other applications. It takes a while to run and shows you remaining scenes to completion.
As VR takes a heavier toll on your Rig, it can also become a relative performance gauge once you have some experience in VR and in performance tuning.
Advanced: Unigine Superposition. Includes VR specific tests.
Step 2: Windows 10 Tuning and Optimization
Simply reducing the background process and services Microsoft has imbedded into Windows 10 will get you more FPS, better FrameTimes, and add significant smoothness to your flying. These changes are well worth your time and effort as overclocking alone will make only make the vampire process faster!
We’re in luck here!
Bryan B. @ TechYESCity has a couple of great videos for easy tuning of your Windows OS. Follow his guidance carefully, you’ll find more power with no risk in his approach.
Windows 10 Tuning Videos
I recommend running these in order.
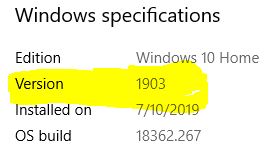
The first video is for those of you who have not yet upgraded to Windows 10 1903.
The second video is for Windows 1903 and up.
Watch them both if you like, there is overlap, but also added tunes in each video.
Windows 10 1803 OPTIMIZATION Guide For GAMERS & POWER USERS!
How To SPEED up Windows 10 1903
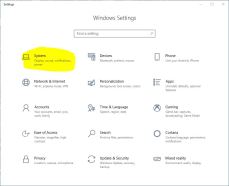
How do I know which version of Windows 10 I have?
- Click the GEAR for Windows Settings
- Click SYSTEM
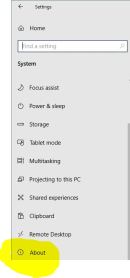
- Scroll down and click ABOUT
- Scroll down a bit until you see Windows Specifications and the info you need.
STEP 3: CPU Management and Overclocking
Your CPU is half of the FrameTime optimization equation.
If you’ve read through the Reverb Setup section, you know that FrameTime gets you the best measure of performance and indication of smoothness in play. CPU overclocking is half of that critical performance indication.
While you may want to use your Rig’s BIOS tuning utilities for overclocking, that may be more technical than some of you want to manage. INTEL offers an all-in-one tool that allows you fairly deep tuning capabilities with less technical (though some) knowledge.
If you want to continue with your motherboard BIOS tuning capabilities, I recommend you search YouTube for videos detailing your Motherboard Model/CPU combo. There is a video out there showing you overclocking for every combination.
CPU Overclocking Utility
Intel offers the Intel Extreme Tuning Utility.
Allowing you to overclock without the need to enter your BIOS for extreme changes.
This tool allows you to get the best performance of your CPU, benchmark the changes, create Profiles for specific applications (DCS.exe for one), and run automatically as the application is launched. Using profiles allows you to step up the speed and overclocking of your Rig at the time you need it, and not be running hot all the time when you don’t.
(WIP – SETUP and GRAPHIC TBD)

[…] have accomplished the “Rig Tuning” [<<<LINK] as noted in this Blog and have completed the basic Oculus Rift S setup per the […]
LikeLike